Chess Board
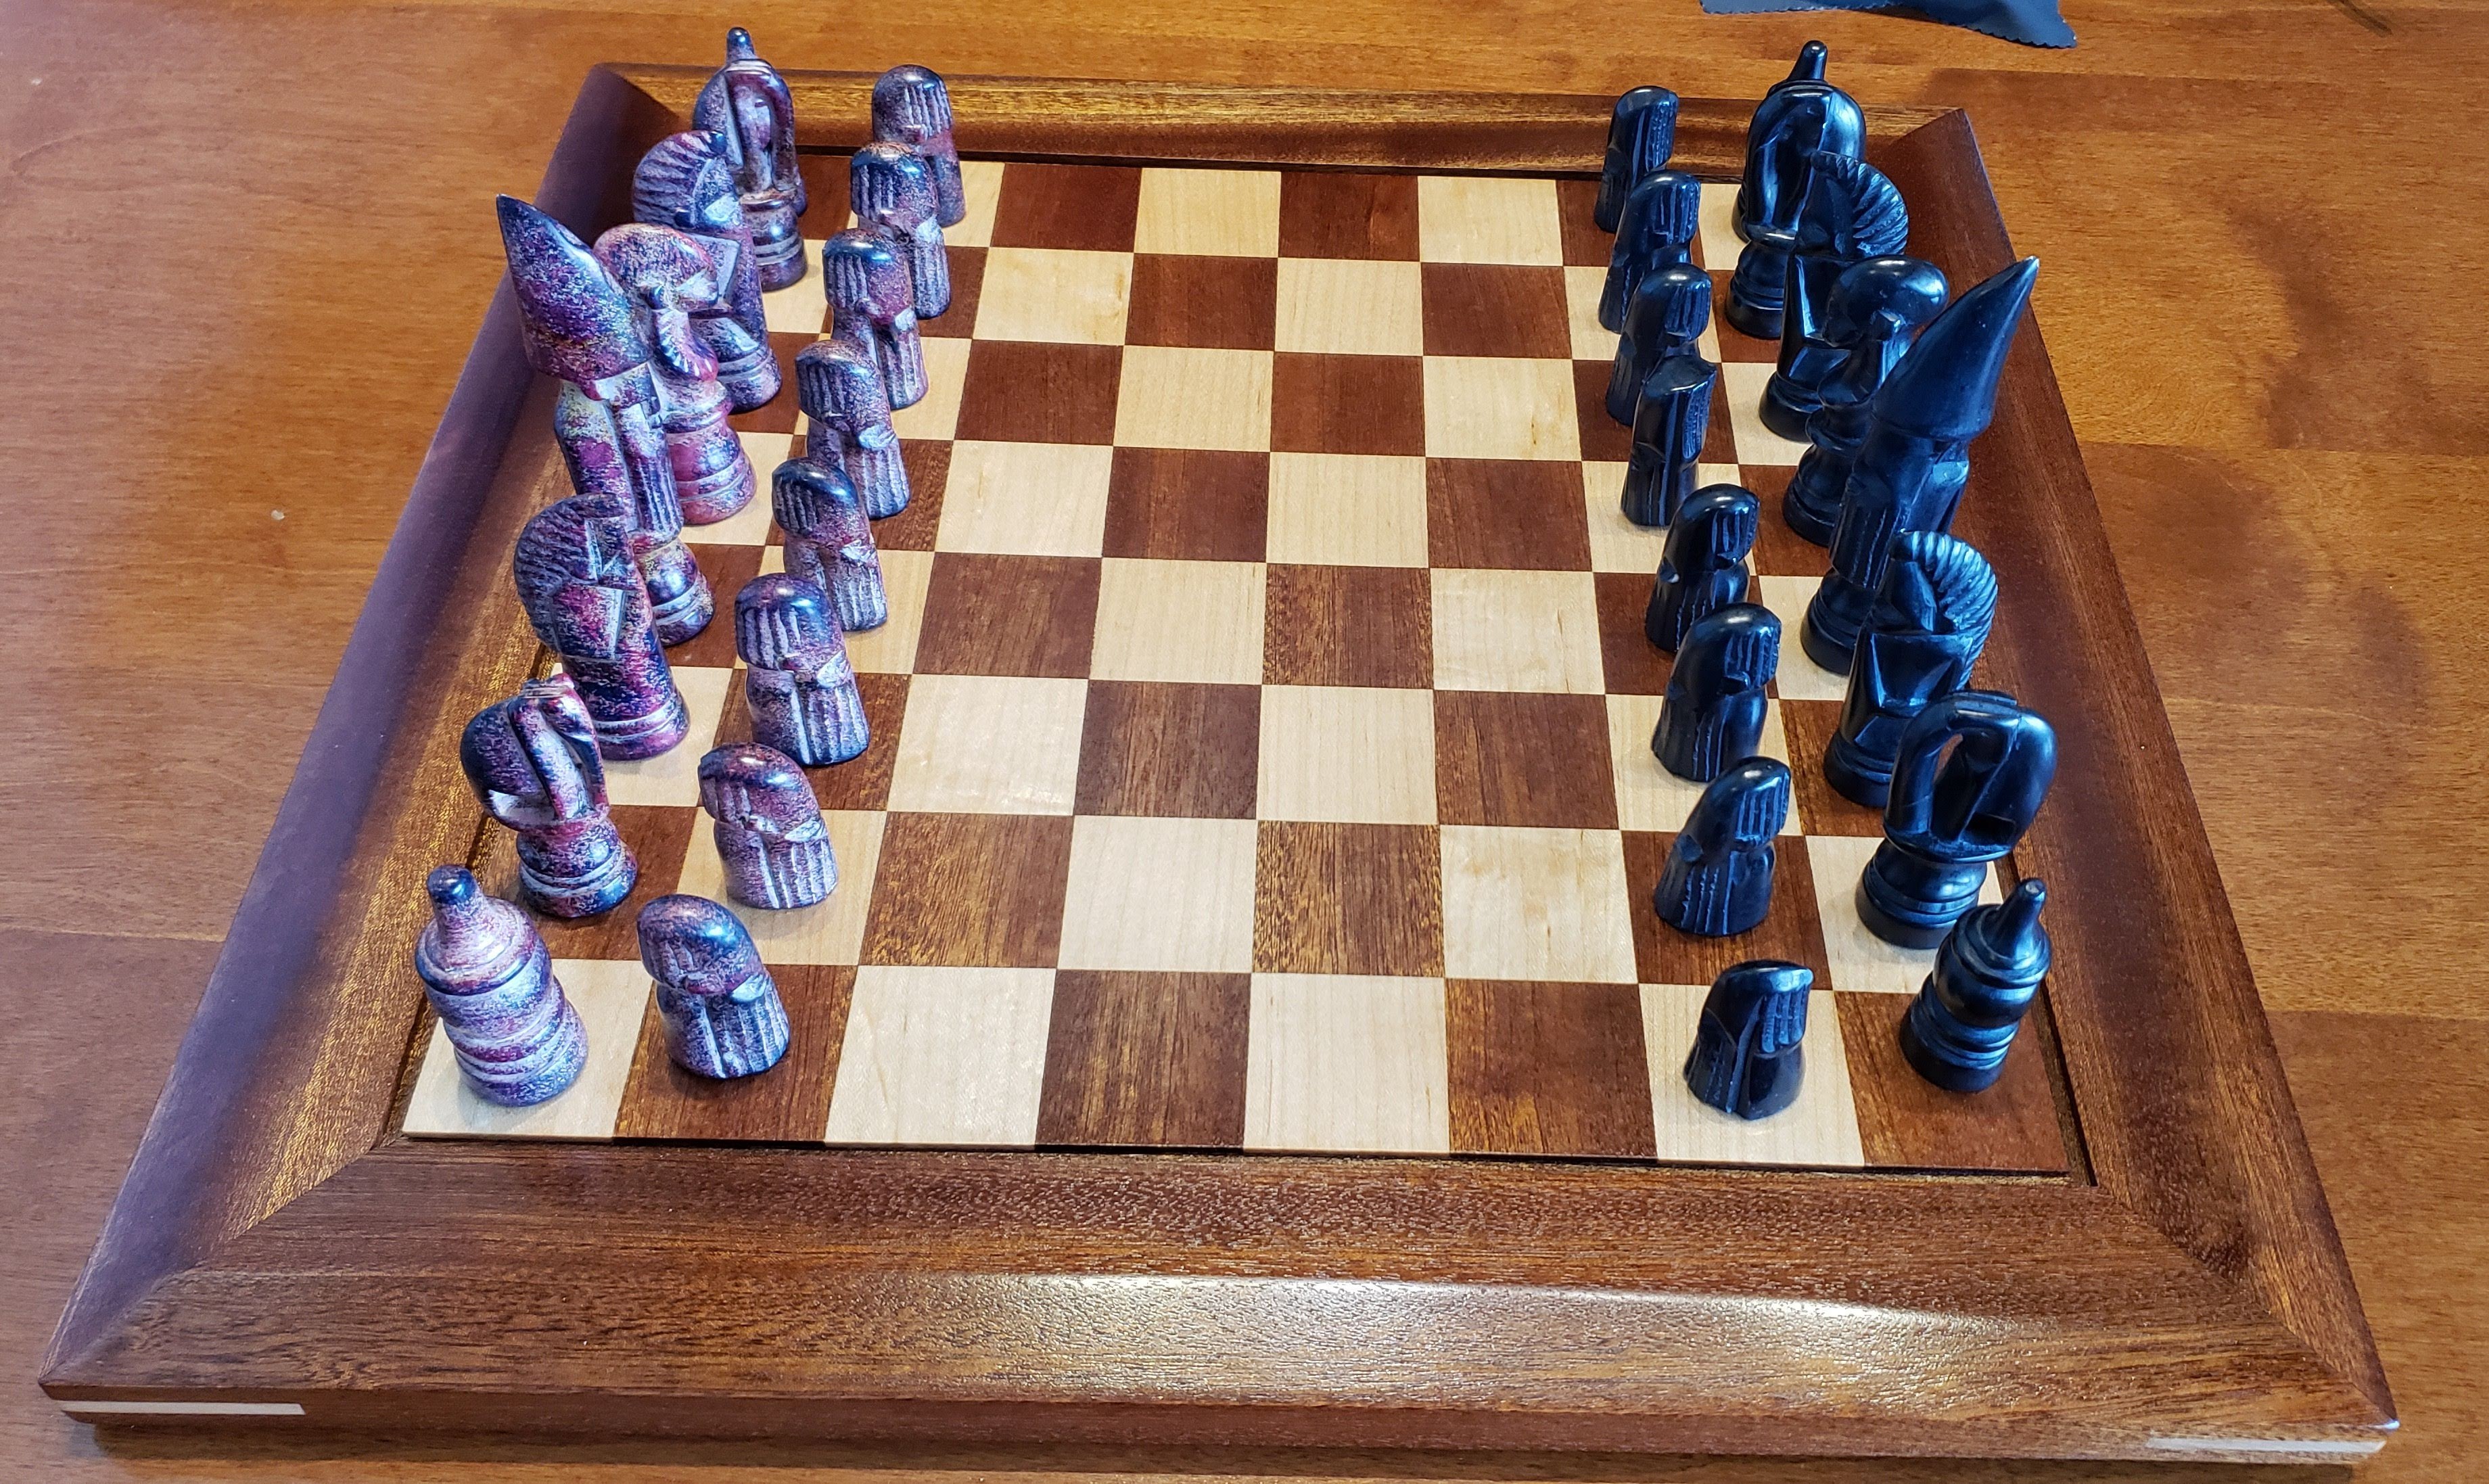
I have a chess set that was given to me by our oldest daughter’s first babysitter (Danielle). Danielle and her family were all family friends. She would come over sometimes, and we would play chess. One summer her family went on a trip to Kenya, and Danielle (who was maybe 14 at the time) came back with gifts for each member of our family. For me she brought back a beautiful hand carved stone chess set. The set also included a stone chess board. Several years after that, we moved from FL to MN, and then six years later we moved from MN to PA. Somehow in the move from MN to PA, the chess board got lost. Julie and I were both positive we put it carefully in the bottom of the cedar chest where it would be safe. When we got to PA, it wasn’t there. We have no idea what happened, but that beautiful board is no longer available to use with those hand carved pieces. I have played with my son, but the only chess board we have that is large enough to use with the pieces is a fold up cardboard Super Mario chess board. It just feels wrong to use those pieces on that board! I have wanted to build a chess board that was worthy of those pieces for a while, and I finally did so.
When I used the sapele to make the urn for my friend Kerry, I knew that I wanted to use that wood on the chess board also. I looked at a lot of pictures of chess boards to get ideas for how I wanted to design it. I also watched a number of YouTube videos to understand what I needed to take into account with regards to wood movement. The result is a sapele and maple board. It has maple corner splines, and all edges of the frame are beveled (top and bottom) at 10 degrees. The playing field itself is just under 1/8 inch thick and is glued to 3/4 inch birch plywood. The bottom side of the plywood has a layer of 1/8 inch thick maple to counterbalance any potential wood movement of the top. The frame is also sapele. Info on the build process is below the video.
The Build Process
The first step was to glue up strips of maple and sapele, then cut that into strips across the grain. I knew I wanted the squares to be right around 1.75 inches based on the size of the pieces. I thought I had cut the strips long enough that I would have around an inch of scrap left over. I was getting concerned as I got closer to cutting the last strip…ended up only having 7/64 of an inch of scrap left on one of them. What I didn’t include pictures of was that before I could make the first cut on this, I had to make sure that my table saw sled was perfectly square. I’ve used that sled hard the last few years, and it wasn’t perfectly square when I checked it. So…I built a new front fence for the sled and used the five cut method to square it up to within .001 inch of square.
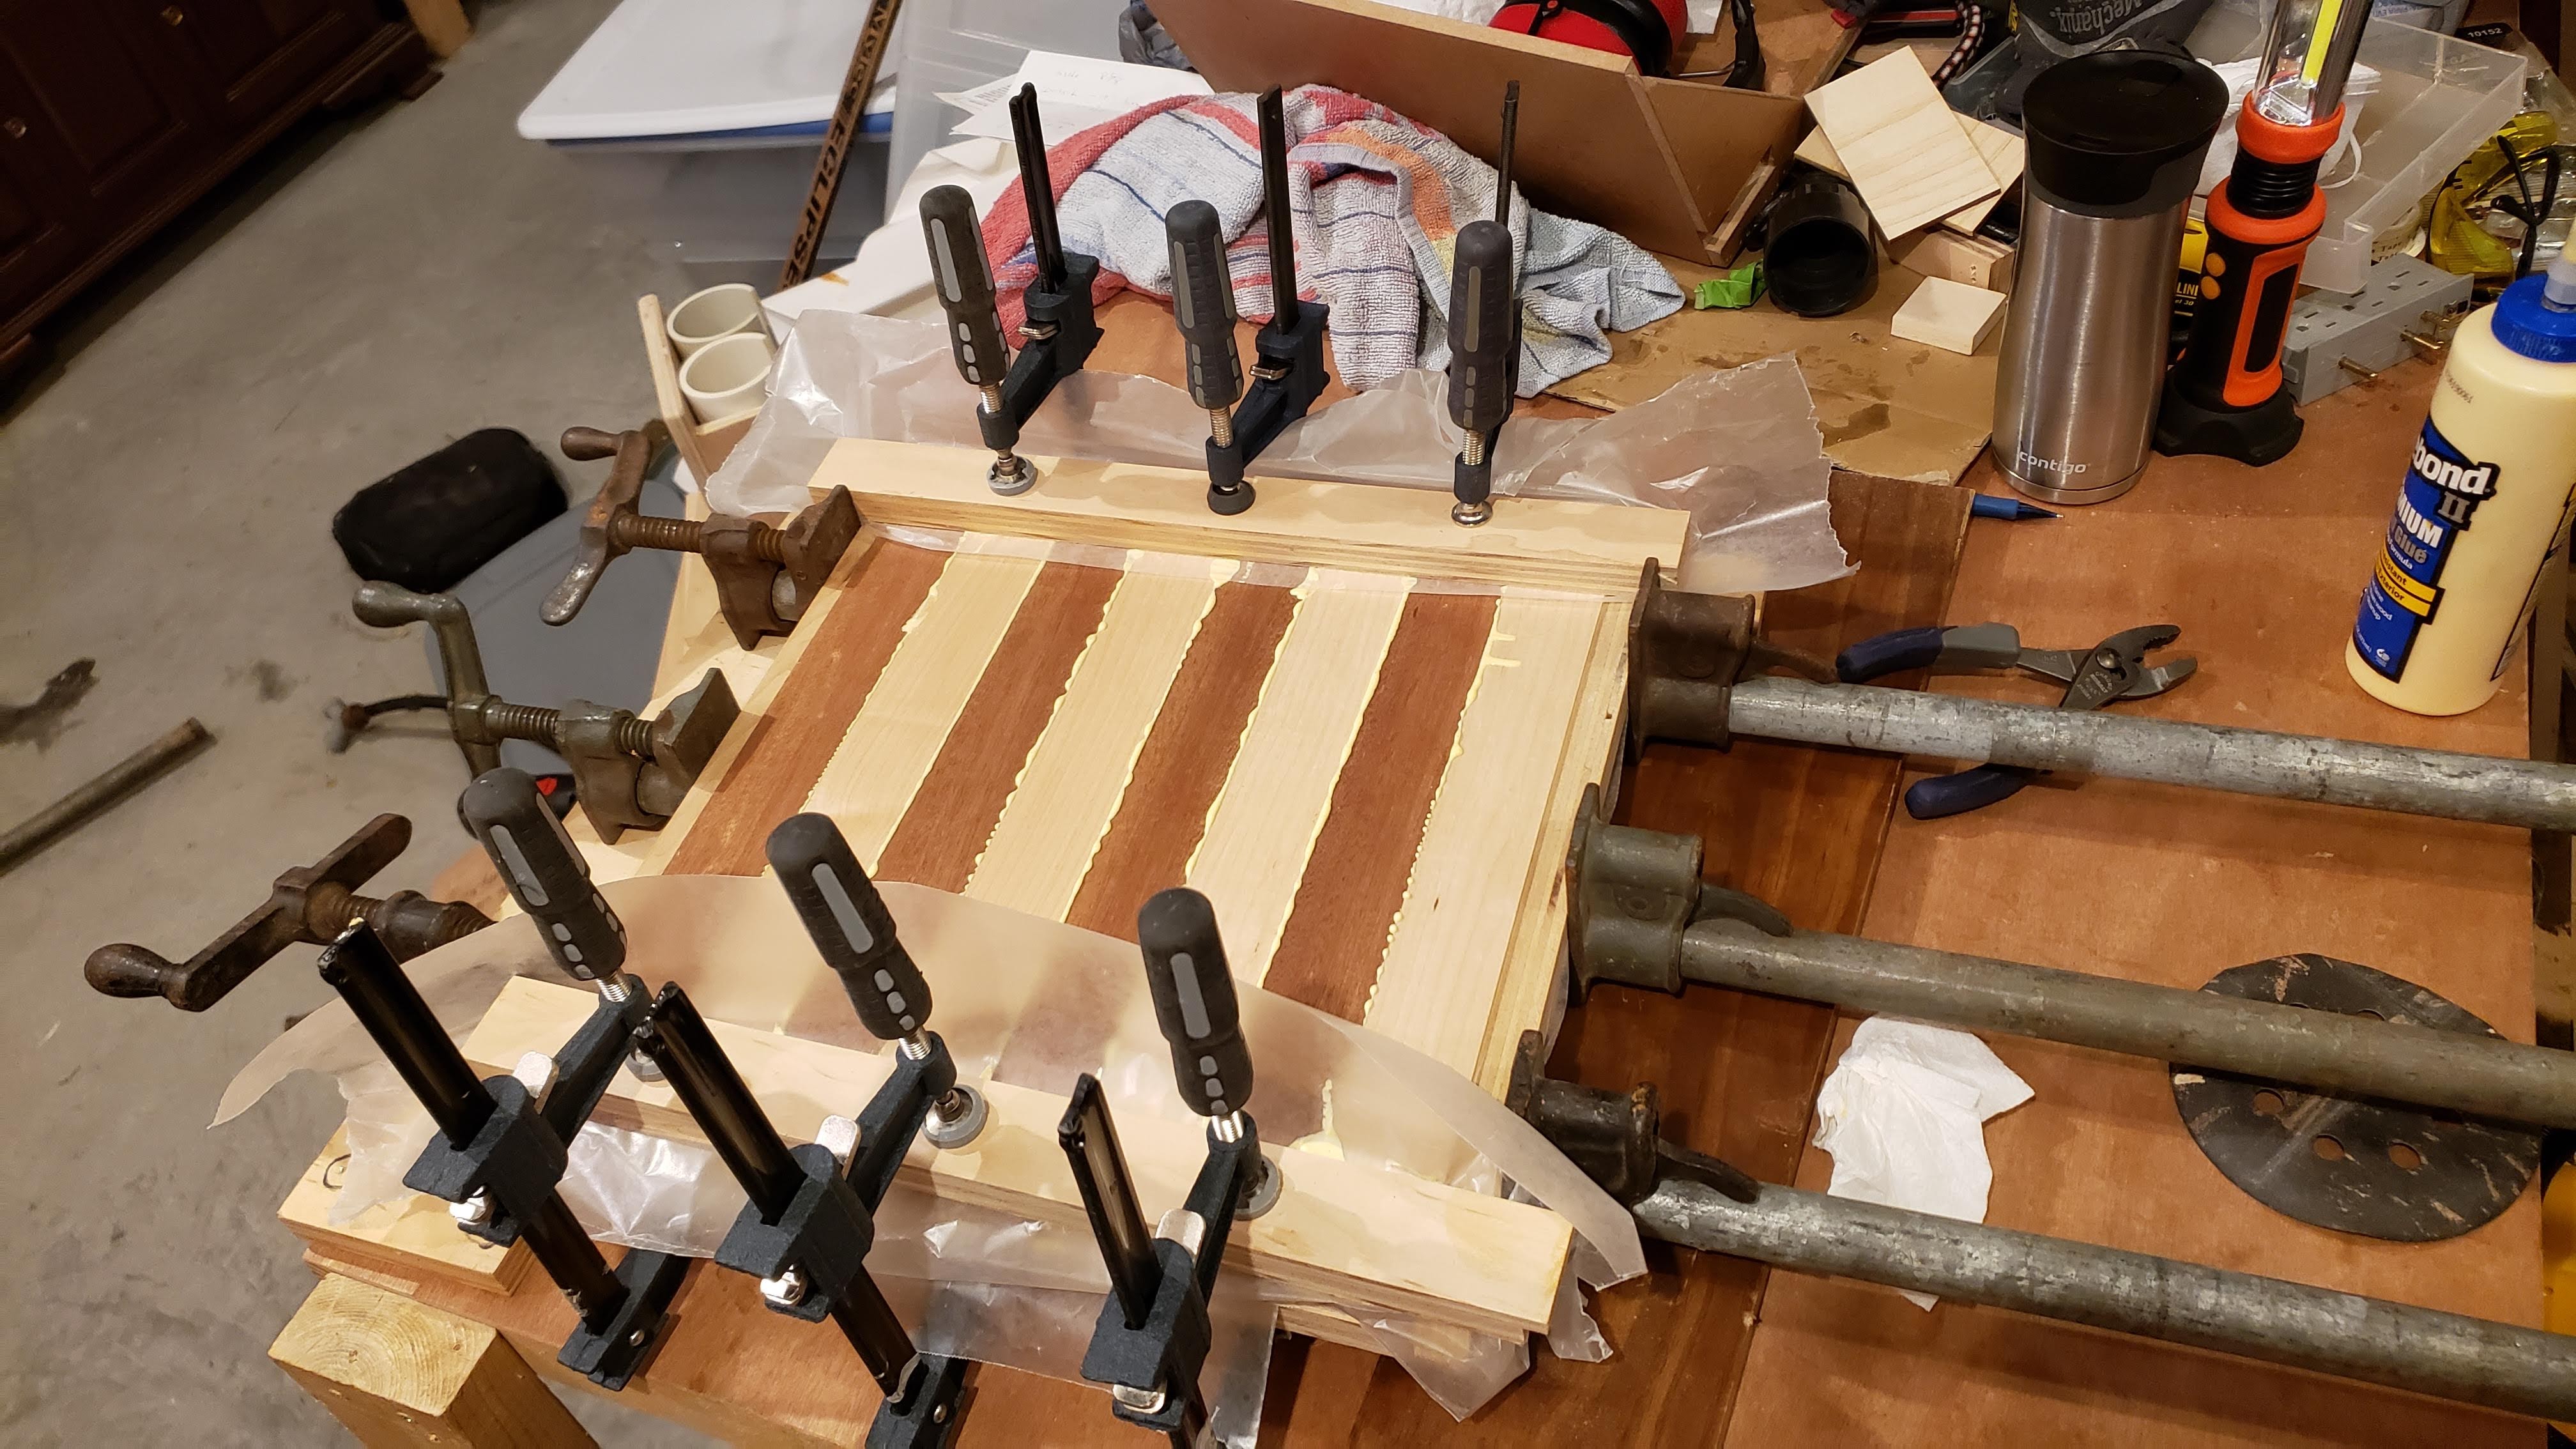

The next step was to take each of those strips and slice off 1/8 inch thick strips to use for the playing field. I didn’t want to use the thick blocks because of concern for wood movement. As it is, I have enough of those blocks left over to make two more chess boards. I then carefully taped strips together on the good side, unfolded enough to put glue in the crease, then laid them flat to let them dry. Essentially used the tape to clamp them for gluing. It actually worked really well to glue up the entire board this way.
It was at this stage that I used the unfinished playing field for a game of chess with my son.


I knew I wanted to have a narrow gap between the playing field and the frame, but I didn’t want the plywood base to be what was seen. So, I trimmed off a very thin layer from the edges of the plywood, cut some thin veneer off of the sapele, mitered those strips, and glued them to the plywood first. Then the playing field would slightly overlap those strips with the rest of the strips being in the dado I would cut in the frame.


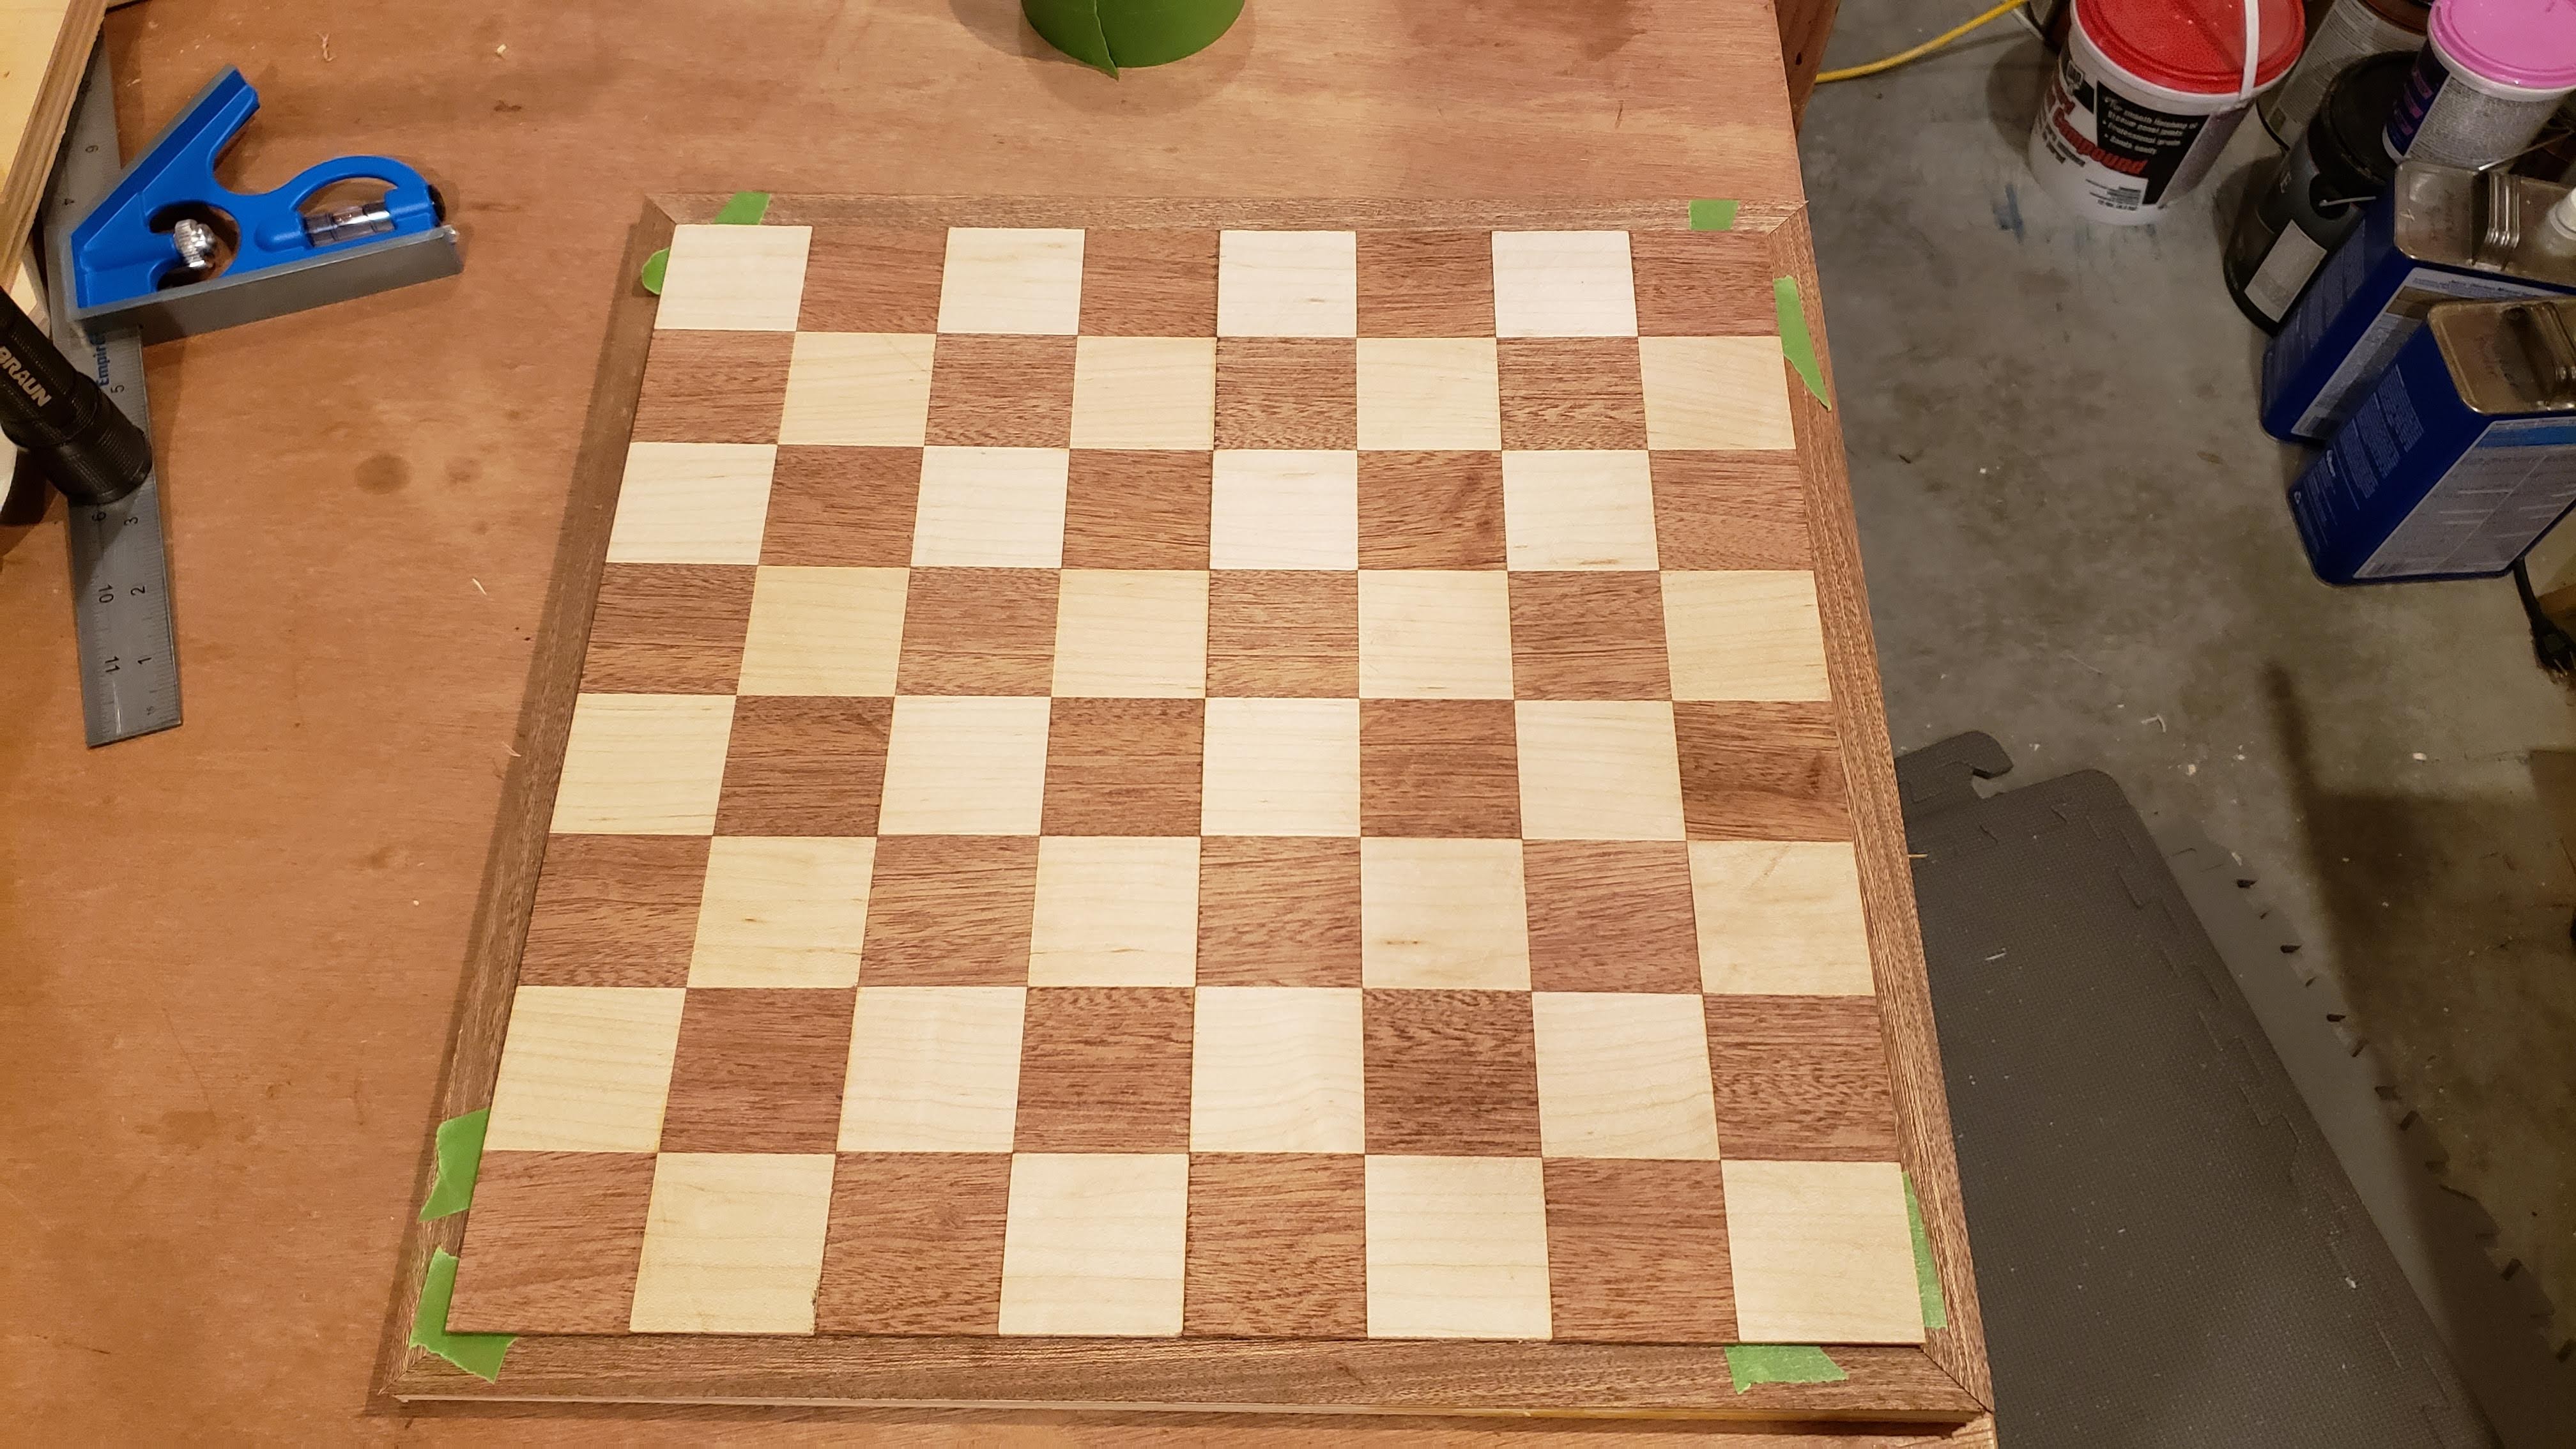
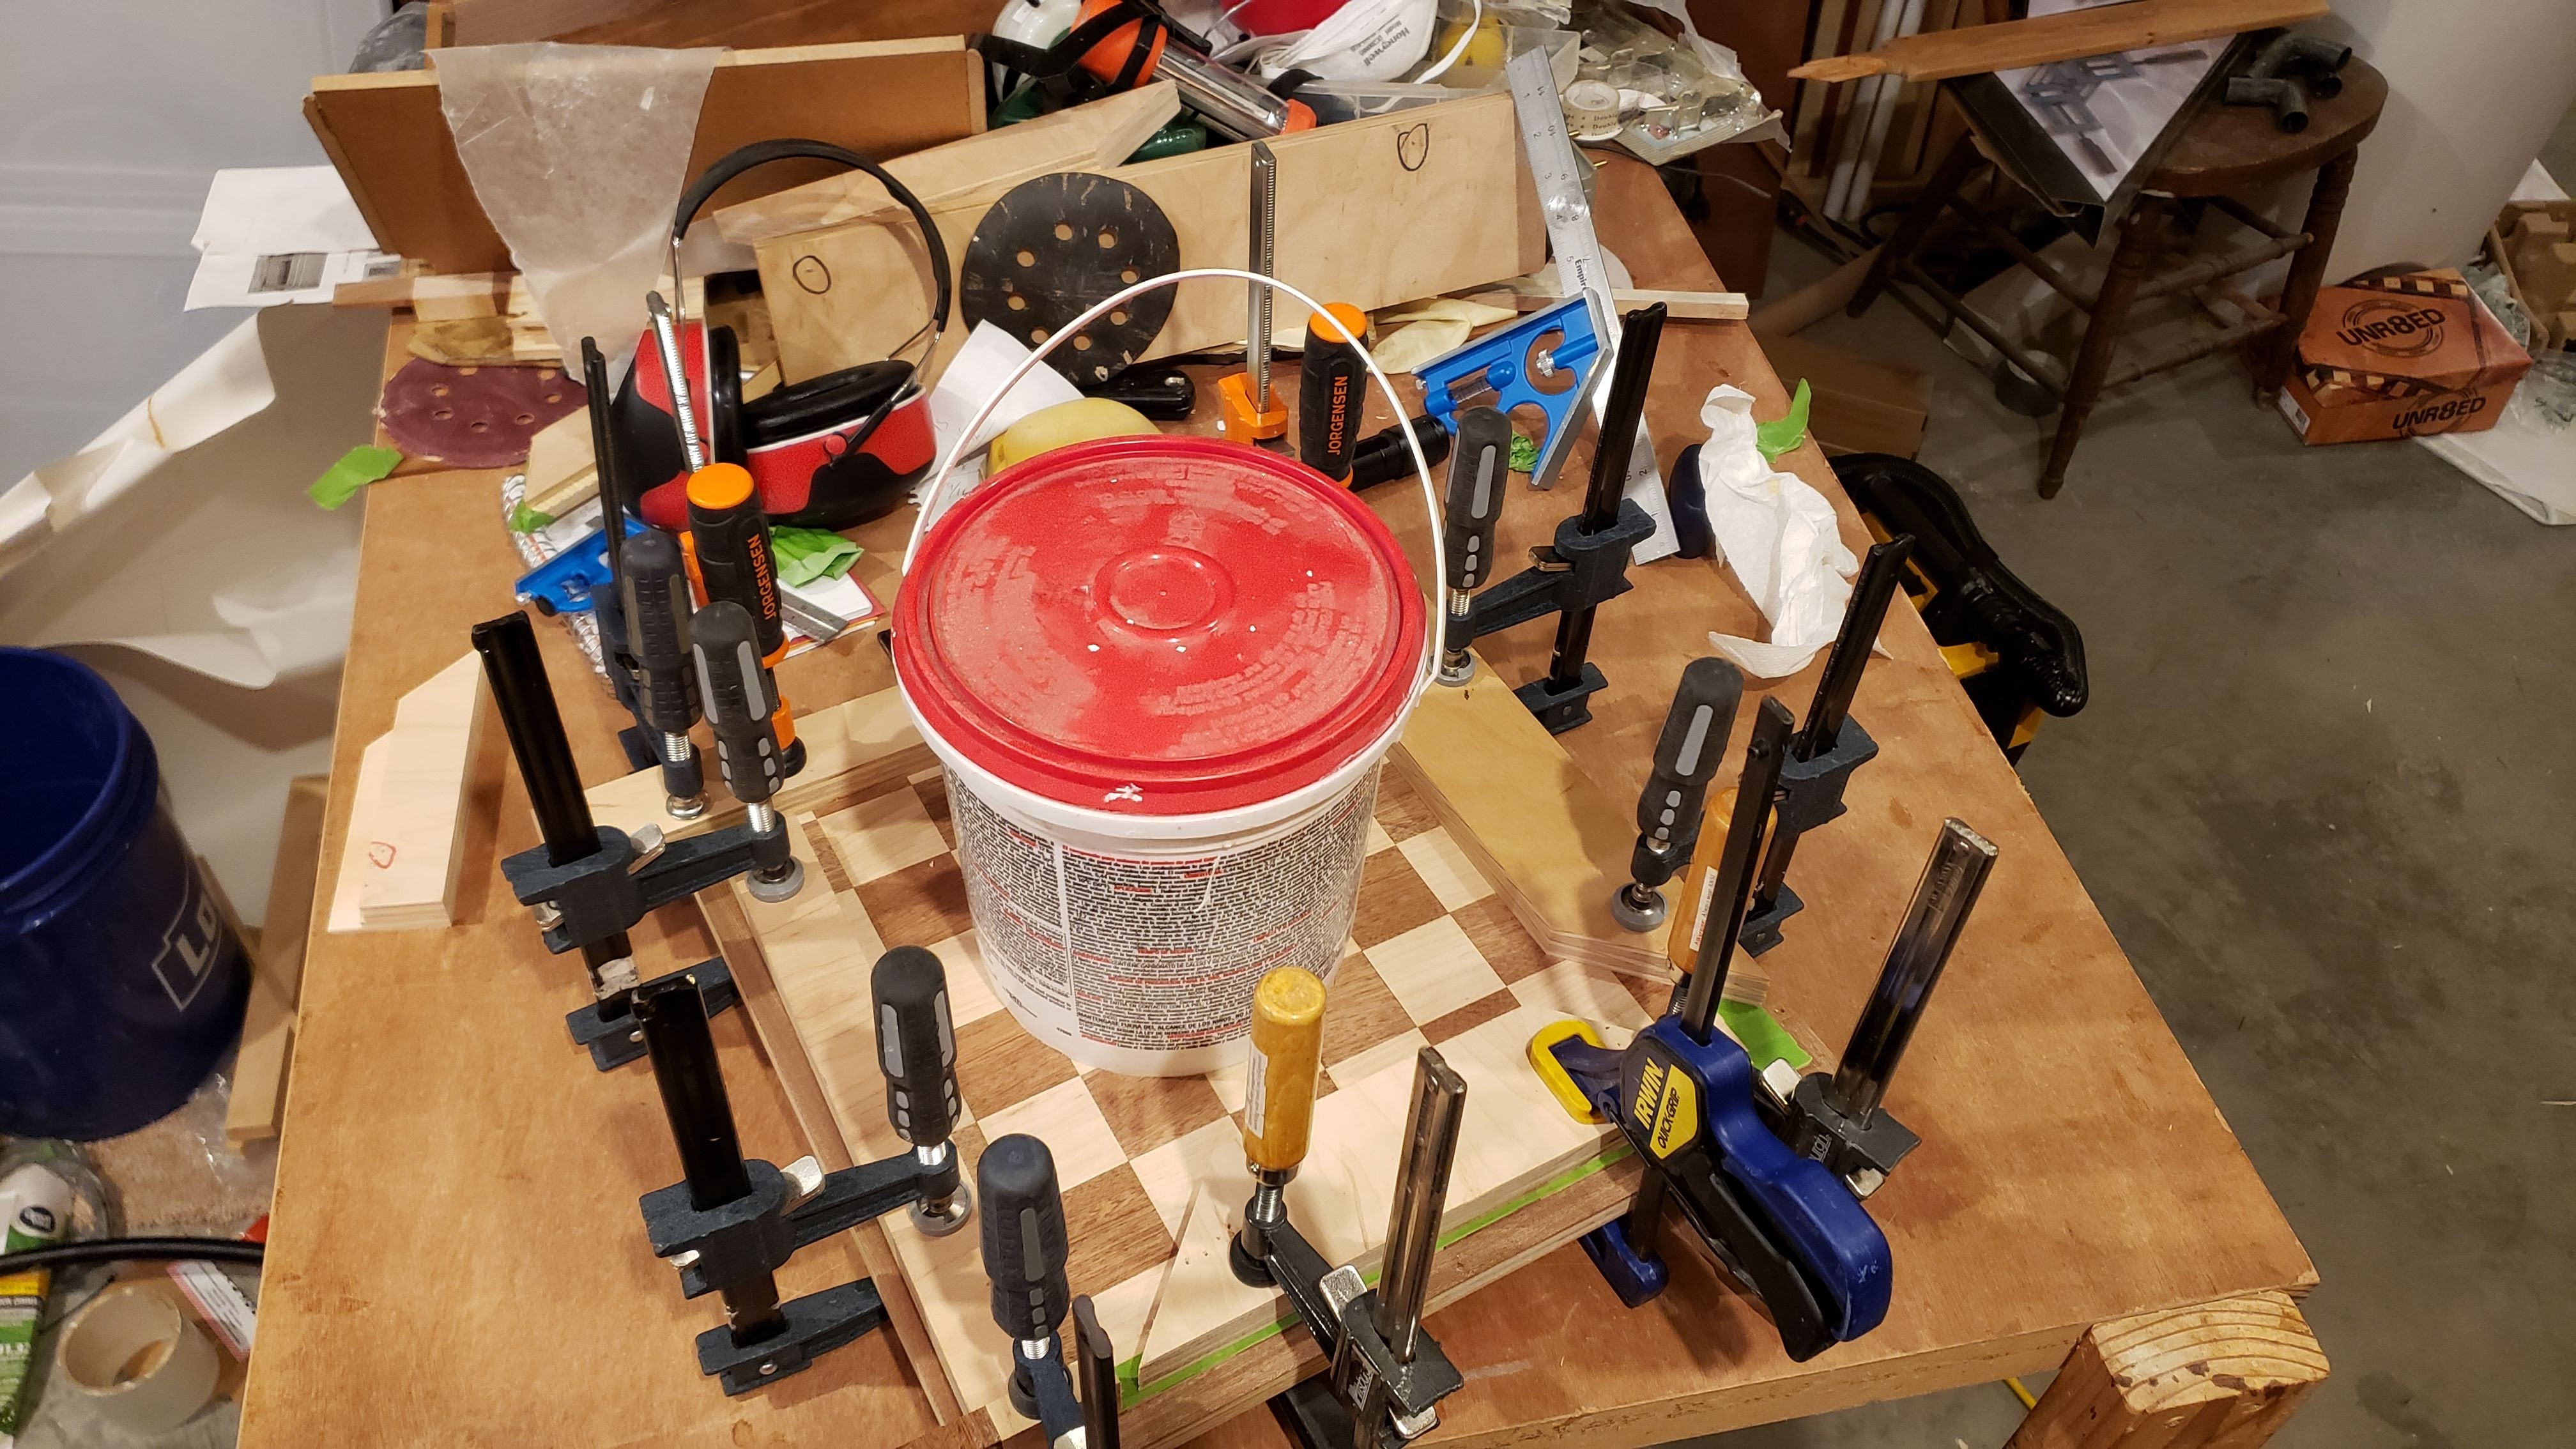
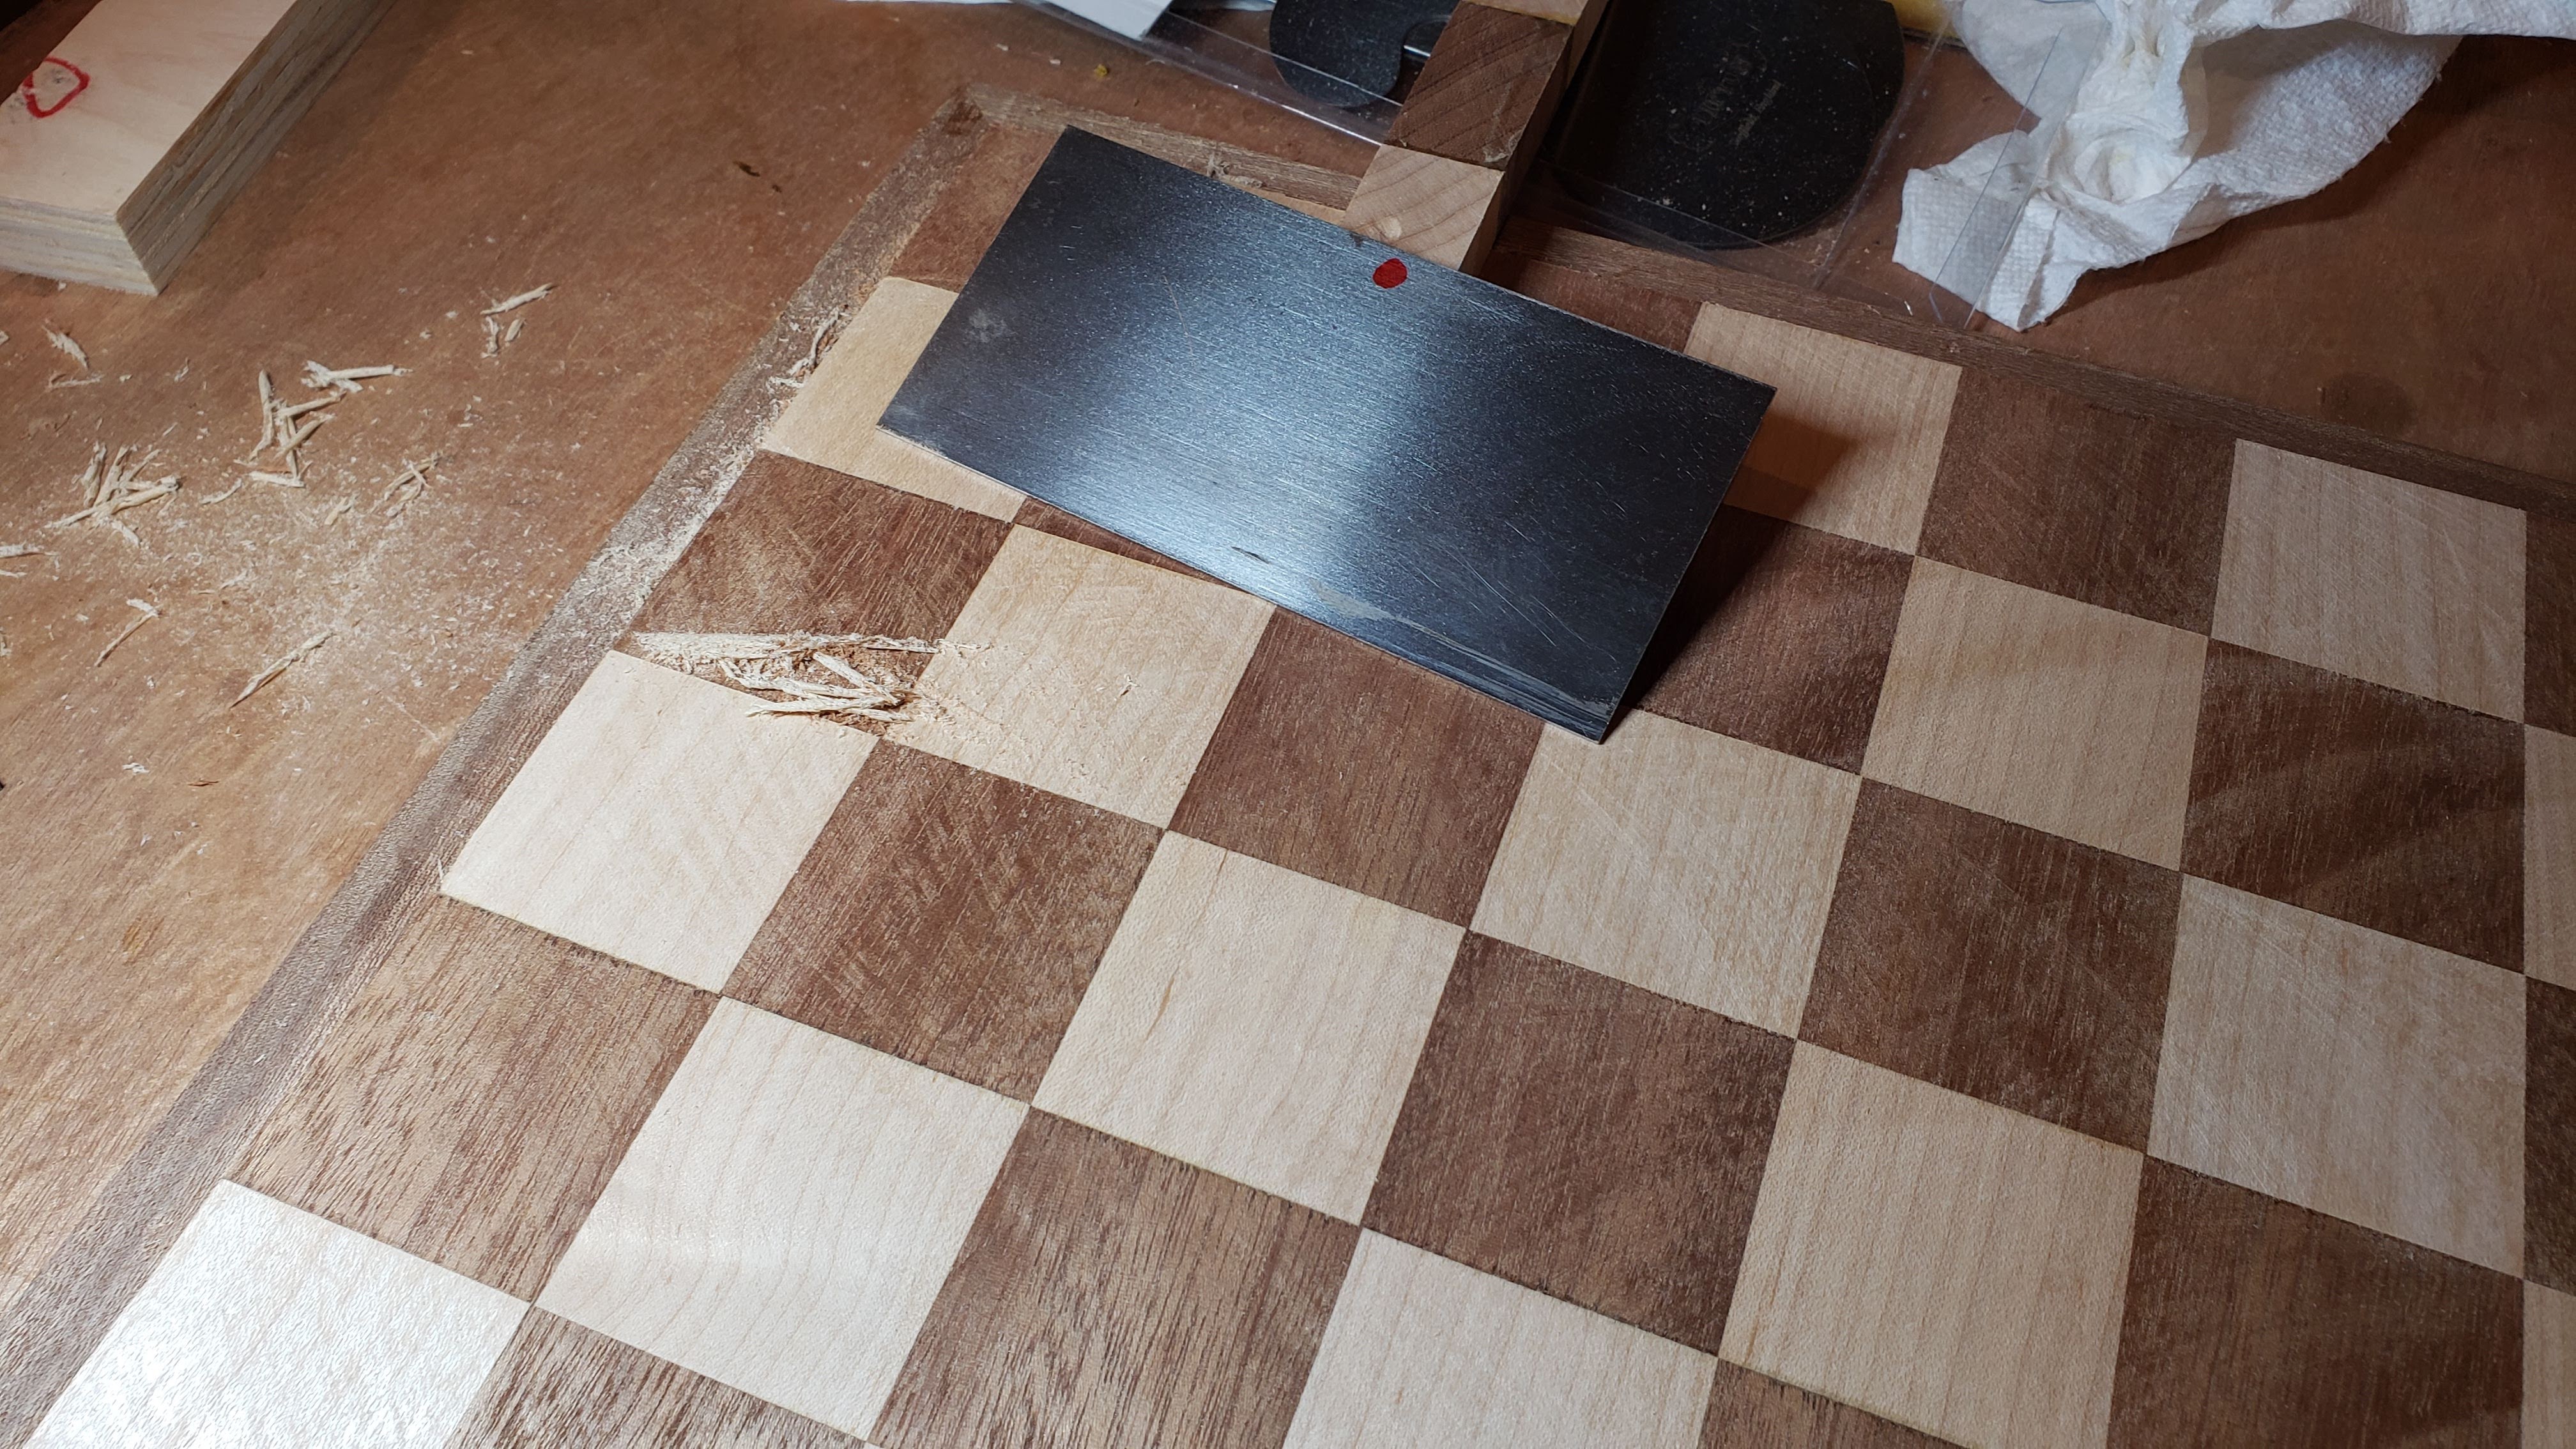
That got me to the point of gluing the playing field to the plywood base. I used a cabinet scraper to level out the slight differences in the squares and get rid of the blade marks. And yeah, I couldn’t resist putting mineral spirits on it to get a look at what it would look like.


I used my Incra miter gauge to cut the mitered corners for the frame. It took me a while to get it adjusted so that it was square, but once that was done, the angles were spot on.


I then built a spline jig for my table saw. Tested it with some scrap wood before clamping the chess board to it and cutting the spline slots. This is a cut that you get one chance to get right. Cut the splines out of maple and sanded them flush. I forgot to take pictures of the other jig I made to hold the board in place to cut the 10 degree bevels.


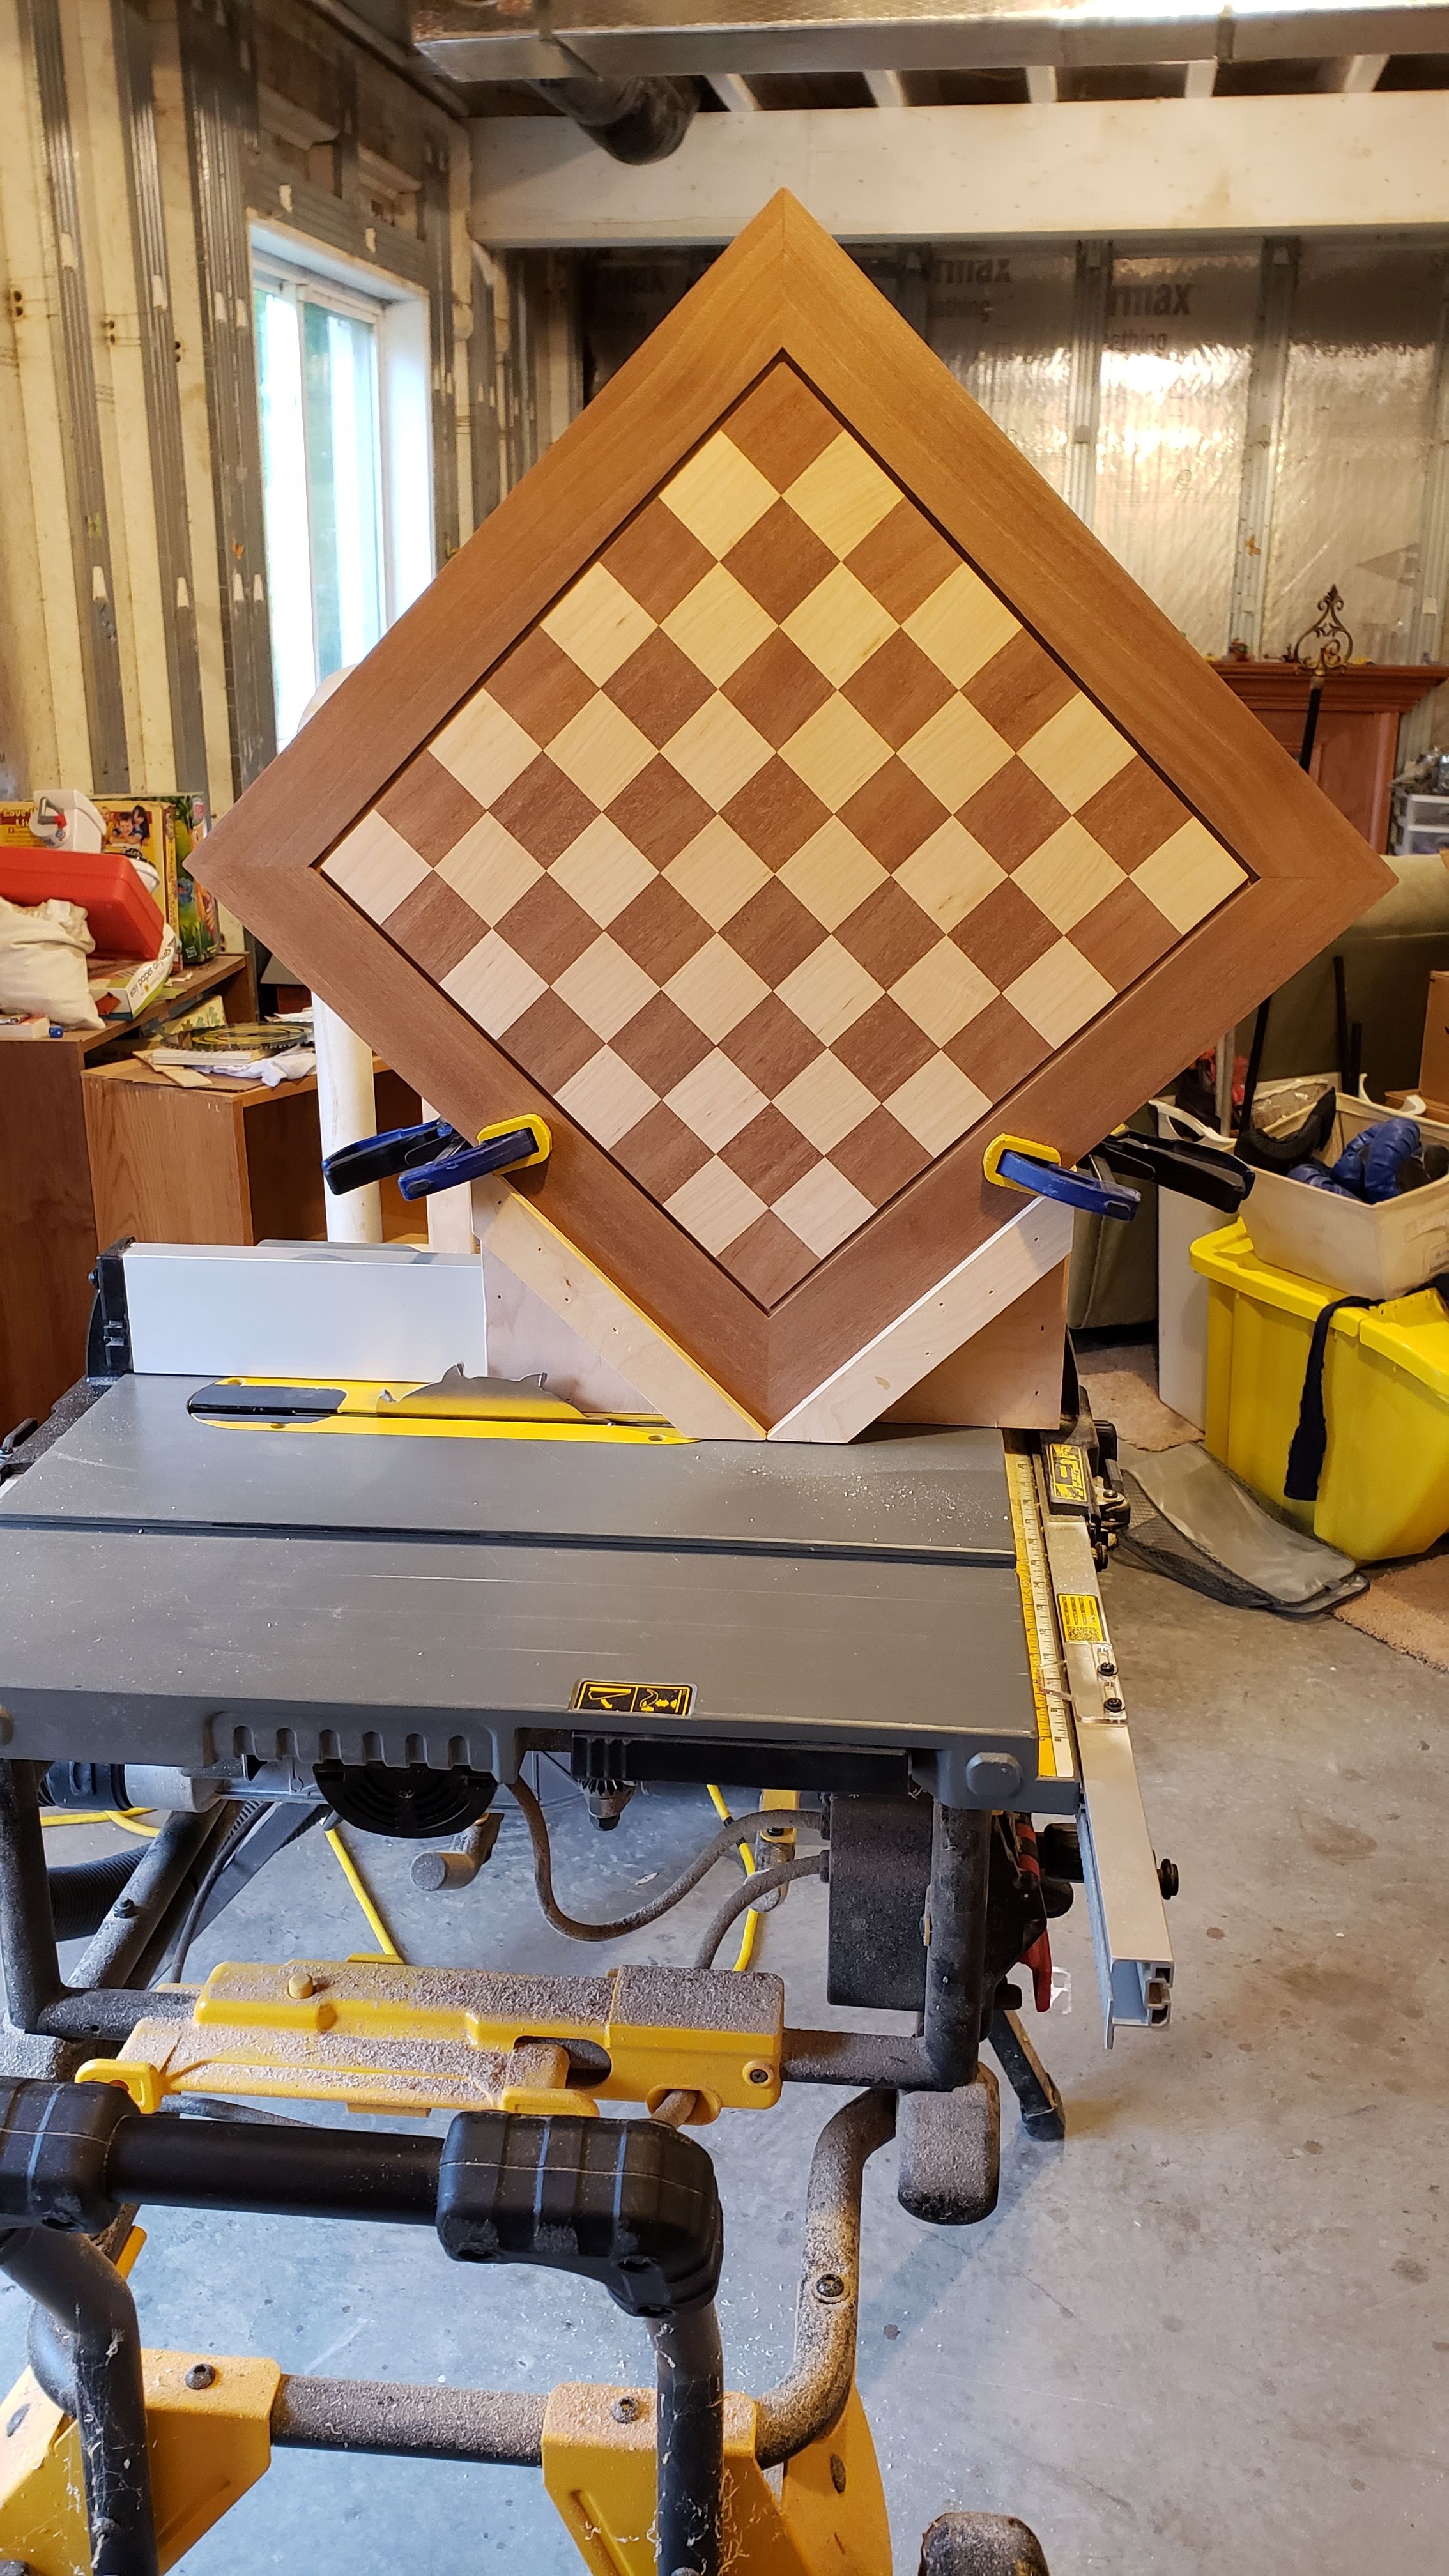


Final result that I’m very happy with. I included a french cleat on the back so I could hang it on the wall.


An urn for my friend
I little over a year ago, a good friend died of cancer. Have you ever had a friend who was always the first one to call you if something was going on in your life? Kerry was that friend to so many people. He would do just about anything for his friends, and he had a LOT of friends. After he passed, I knew he had planned to be cremated. I talked to his wife who is also a very good friend, and offered to make an urn for Kerry if she would like. If she didn’t want that, obviously no problem, but I would be happy to honor my friend by making this. She said yes, and I spent over a year determining the right design for this particular project – to both honor Kerry but also to be something that Jess would appreciate. I wanted the project to reflect some aspects of Kerry.
- Kerry was not a flashy person. Plain is certainly not the right word, but he just wasn’t flashy. This project is not designed to be a focal point. It was designed to have the ability to go unnoticed if desired/needed.
- Kerry was also strong. Our community is poorer with his absence. Because of that, I wanted this project to be strong and well made.
- Kerry’s heart was beautiful. He deeply cared for people, and you knew it. So, while this is not designed to be a focal point, it did need to be beautiful.
Here is a video of the finished urn. Below the video is a writeup of the design and build process with pictures, starting from the SketchUp design to completed build.
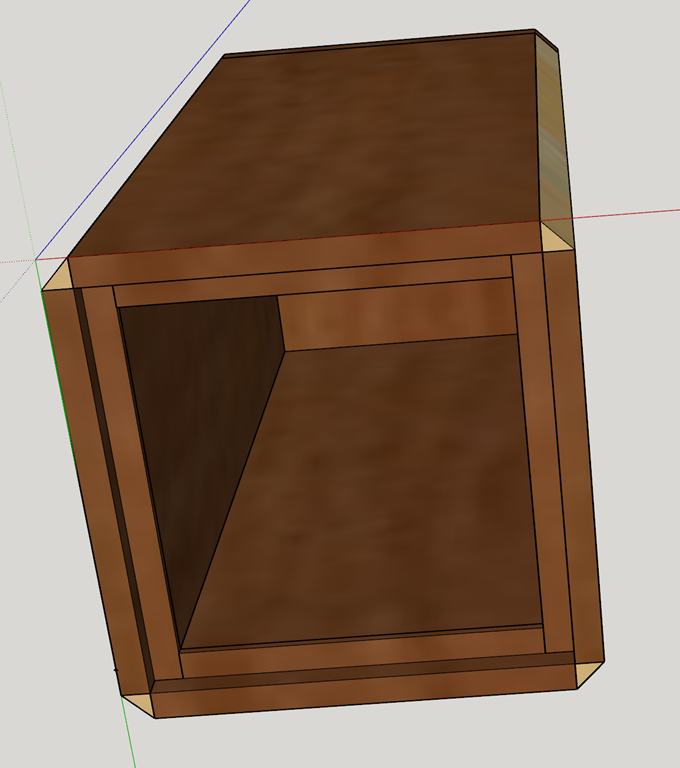
For most of my woodworking projects, I will start by doing a 3D design (with all cuts/joints) in SketchUp. I used SketchUp to design a couple of ideas that I ended up not using before finally getting the right idea for both Kerry and Jess. Here is the design as drawn up in SketchUp.


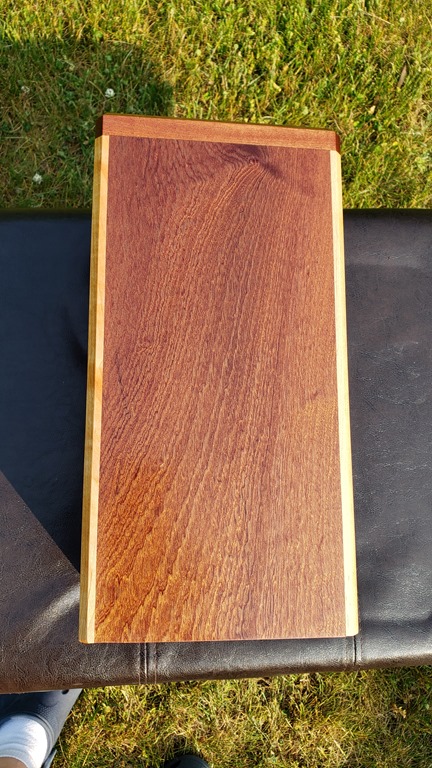
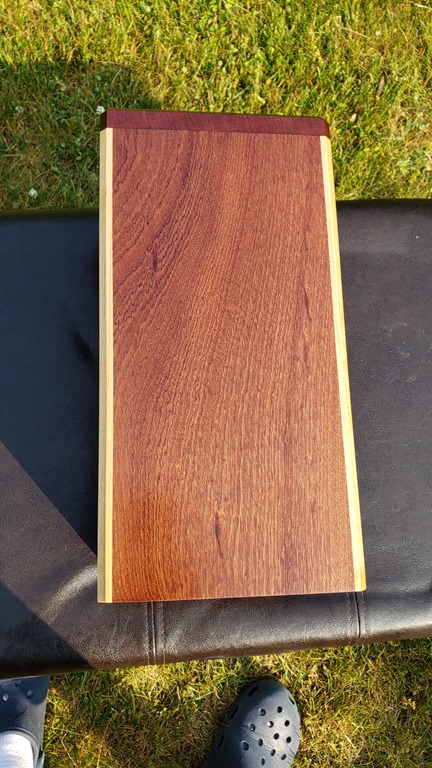
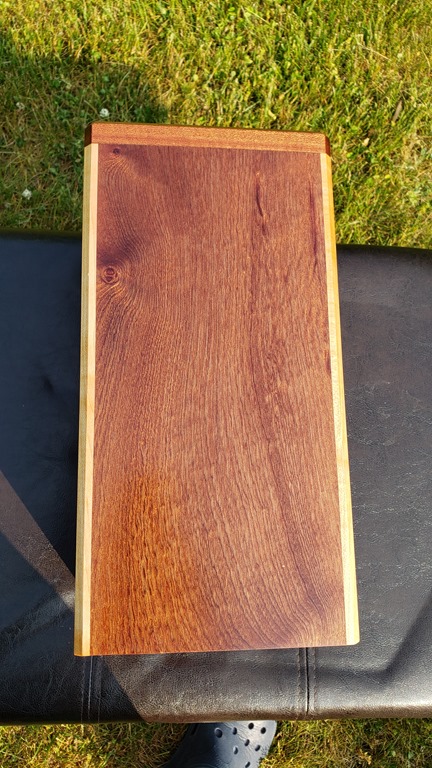
I started out the some 4/4 sapele for the main body, and I had plenty of maple left over from other projects for the corners. I had never worked with sapele before, but I will definitely use it again. That stuff is amazing. The interlocking grain is almost iridescent with the way it shimmers and changes when you view it at different angles in the light. Here are some pictures of the build process along with a video that attempts to show the beauty of the wood. The closest you get to seeing the true beauty in the video is actually when viewing the bottom. The board on the right in the picture below is the sapele. I also had some walnut that I was planing at the same time. I originally considered making the corners with the walnut, but decided on the contrast with the maple instead.


The cuts for this project were actually really easy. Just a matter of setting the table saw fence and blade height to 7/16 (half the thickness of the planed lumber). The design of the joints meant that the even pressure of the bungee cords would pull all of the joints in tight and perfectly square. The joints were designed to leave a 7/16 square out of outside of each corner that I could then glue the maple into.


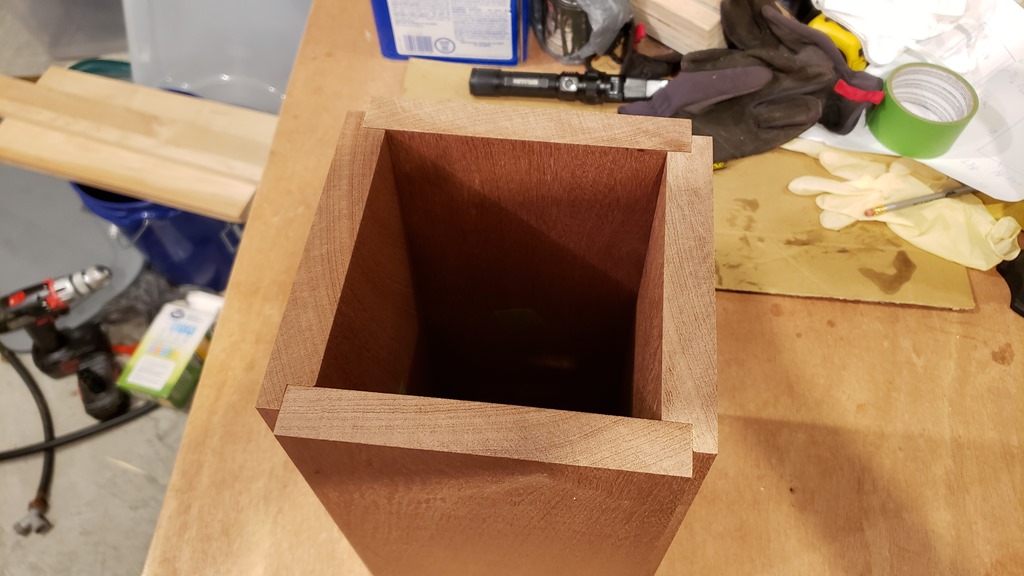

I cut the maple corners slightly larger than needed for the corners and used a flush trim router bit to get them perfectly flush with the box. Again, I used both clamps and a bungee cord to pull them in tight for gluing.
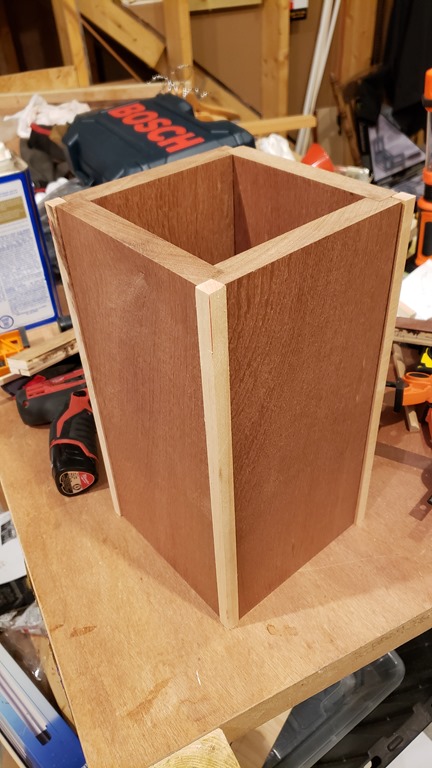


Got the top glued on with multiple clamps. If I had it to do over again, I would have cut the top slightly larger to make it easier to glue up. After the glue was dry, I used the flush trim bit again. I clamped it to the side of my vacuum cart to make it easy to get all sides of the top trimmed.


Last part was to use a chamfer bit on all corners and sand it smooth down to 800 grit. I couldn’t help but to wipe it down with mineral spirits to give me an idea of what it was going to look like when it was finished. I also made a quick platform to hold it for drying when I applied the finish. The finish started with a coat of boiled linseed oil to bring out the depth of grain and color. After that dried, I finished it off with three coats of clear gloss lacquer.


Pictures and video of the final product.


Building a Hammered Dulcimer–Take 2
It’s a little sad that the last time I posted was almost two years ago, and now I’m posting a follow up to that post. When I built the hammered dulcimer a couple of years ago, there was a problem with the instrument that came up shortly after I built it. Basic gist is that the soundboard collapsed due to a structural failure. I combined two different sets of plans when I made that dulcimer. One of the plans said you could get good sound using 1/4 inch plywood for the soundboard, so I used that. What I failed to note was that the internal bracing for that set of plans was different from the bracing that I used from the other set of plans. The end result is that there wasn’t proper bracing beneath the bass bridge, the soundboard collapsed, and there was no way to salvage the instrument. I had spent too much time on it at the time to even think about rebuilding from scratch at that time, so it unfortunately went on the back burner for well over a year.
A few months ago I pulled that project back out and built a new hammered dulcimer for my daughter. It went much faster the second time around because I had learned a lot from the first time, and I have gotten better at woodworking since then.
Here are a few pictures of the end result. I am very pleased with how it turned out. In a nutshell, this is the most beautiful thing I have ever built from wood, and there isn’t a close second. There is a video below of me talking about the instrument and playing a couple of short segments (the beginning of Ode to Joy and the intro to Creed by Rich Mullins). No, I don’t actually know how to play it, but I can learn just enough to at least vaguely sound like the song.
The frame and internal bracing are all made from hard maple. The soundboard is mahogany, and the bridges and side pieces are from purpleheart. And yes, purpleheart is naturally purple. The whole thing got a thin coat of boiled linseed oil followed by multiple coats of lacquer.


Building a Hammered Dulcimer
Back in November, my wife approached me about building something that our daughter asked for for Christmas…a hammered dulcimer. I enjoy woodworking, but building a musical instrument? That would be a stretch at best! Julie had found plans online, and pointed me towards them. After looking at it, I determined that from a woodworking standpoint, it’s basically building a box…a trapezoidal box. I can do that…and if the plans can help me precisely position the tuning pins/etc, then I could do it. Let the adventure begin!
For those who don’t know what a hammered dulcimer is, it is stringed instrument that is played by striking the strings with small wooden hammers. Our family first heard the instrument through the music of the late Rich Mullins. Here are a few links to some very talented musicians playing the instrument.
- Ted Yoder covering “Everybody Wants To Rule The World” by Tears for Fears
- Joshua Messick with an original instrumental song named “Woodsong Wanderlust”
- Rich Mullins instrumental “78 Eatonwood Green”
- Rich Mullins “Calling Out Your Name” (It’s crazy seeing him play this thing and sing at the same time!)
Throughout the build I took lots of pictures because I figured I would get around to writing this blog post about the build.
I took the plans from MusicMakers and then made some modifications to the frame design based on a post on the Smithsonian site by a famous dulcimer builder name Sam Rizzetta. The plans call for a simple 90 degree joint for the bottom corners. Sam uses a different joint on all four corners that is much stronger…as the strings provide tension, the joint can only get stronger. But that did involve figuring out the angles and how to best cut this without making mistakes.
Step one was to work with some scrap wood to figure out how to best go about doing the cuts before wasting the good wood. I started by just eyeballing the angles onto a scrap of plywood just to get it close.

What that helped me figure out is that if I planned it right, every single angle of the frame would be either a 30 degree or a 60 degree angle. That meant that as long as I dialed in my table saw blade perfectly on that angle…it could cut the entire frame by just changing the height of the blade. Continue reading
Choose to Love
Lately I have been bothered by how our society has become so abrasive…so uncivil…so unloving. This has been percolating for over six months. On Sunday I filled in for my pastor who was out of town. The message I gave was addressing our need to both love God and love those around us.
One of the lessons in the parable of the Good Samaritan is that we are called to love those that we are put in contact with. This specifically includes people who are very different from us. Believe it or not, there was more animosity between Israelites and Samaritans than there is between Democrats and Republicans today.
We are called to show love to those around us. Our society has devolved to the point where it seems illogical that two people can disagree on a topic without one or the other believing that the other person hates them because they disagree. It doesn’t have to be this way. Just because we don’t agree on everything does not mean that hatred is the natural result. It is possible for us to disagree on topics (even very big topics) and still be civil to one another, to be friends…to even still show love to one another.
Honestly, it is easier to love those who are similar to us. Some of the people we are in contact with today will not be easy to love. And some will say the same of you and me. Many won’t return the gesture. We should choose to love anyway. Is this easy? No, sometimes love is really hard. And sometimes it requires God changing our hearts. But it is possible, and it is worth it.
One point that absolutely needs to be made. We cannot trust or expect that a change of this nature will come from the leadership in our country regardless of who wins this election. This kind of change starts in the hearts and minds of individuals. It starts in the hearts and minds of people like you and me.
We have a choice. Do we continue with this horrible status quo of our society or do we choose to make a change? Do we choose to love those with whom we disagree? You have a choice. I have a choice. We can choose to love. We won’t get it right all the time. We will mess up along the way. It will be hard. But it will also be worth it.
Join with me. Choose to change our society. Choose to love.
New Blog on Hackers and End of Life Products
I just posted a new blog to the CDW Solutions Blog titled “Why Hackers Love End of Life”. I have to say that it was fun to start a technology post with the phrase “The smell of potato chips and a few too many energy drinks wafts through the air.”
You can see all of my CDW blog posts here: http://blog.cdw.com/author/jarvis/
Windows 10 Cisco AnyConnect Issue
I’m running the publically available Windows 10 Technical Preview and have been having an issue connecting to my company’s VPN using the Cisco AnyConnect client. The error messages that come up are:

and

After doing a bit of digging, I came across some logs in the AnyConnect logs (in the Windows Event Viewer), that looked like this:
Function: CNetInterface::GetGatewayAddress
File: .\Utility\NetInterface_win.cpp
Line: 190
Invoked Function: CNetInterface::GetIPAddrInfo
Return Code: -32571377 (0xFE0F000F)
Description: NETINTERFACE_ERROR_INTERFACE_NOT_AVAILABLE
They all had the same description: NETINTERFACE_ERROR_INTERFACE_NOT_AVAILABLE. Doing a quick Bing search led me to this article which included the following line:
Confirm that only one instance of the AnyConnect adapter appears in the Device Manager.
Well…I certainly hadn’t taken a look in Device Manager in quite a while, but when I did…guess what I found…a duplicate (and disabled) AnyConnect adapter.

Once I removed that extra disabled adapter, AnyConnect connected the first time through.
One more thing to keep in mind though…there is still the issue of extraneous characters in the DisplayName in the registry that I blogged about a couple of years ago related to Windows 8.
Another Windows 10 / OneDrive Issue
Yesterday Microsoft released the next build of Windows 10 to those of us in the public Tech Preview (fast group). Build 9879 has several changes that you can find in this blog post.
I kicked off the update to Build 9879 before heading out for a run late in the day. When I checked Twitter last night I was a bit nervous when I saw Rod Trent and Paul Thurrott commenting that there were issues with OneDrive. Paul’s comment was “OneDrive is borked”.
There really are two issues that I have seen. One is a feature change…that the “smart files” function has been removed…which I agree is a bad idea. Read more about that issue here. I can get around that because I sync all my files anyway. The bigger issue for me is that OneDrive simply would not sync. THAT is a significant issue…so I started digging around this morning and noticed some issues…and found what appears to be a workaround.
As I looked at the files that were not syncing, I noticed that they were all Microsoft Office files. If I had a folder that had something like a PDF file in it…that file would sync, but not Office docs. That triggered a memory. There is a “Use Office to sync files faster…” setting in OneDrive. This setting tells the OneDrive app to essentially pass off any change to an Office document to the “Microsoft Office Upload Center” app for synchronizing. The Upload Center does the actual syncing for the Office docs. In general, this is a good setting for a number of reasons that I won’t go into in this post.
Apparently something related to that handoff between OneDrive and the Office Upload Center is broken. As long as that setting is not set, OneDrive is backing up all of my Office docs in addition to everything else that was already working. If that setting is set, then the OneDrive app stays in a perpetual “Processing changes” state.
To resolve the issue, right click on the OneDrive icon in the system tray, then uncheck the box next to that setting.

Windows 10 OneDrive Bug
I have been a long time user of OneDrive for both accessing my files from multiple devices as well as backing up all my files to the cloud. Recently I installed the Windows 10 Technical Preview on my laptop (which I have really liked btw). This week the first update to Win10 (Build 9860) was released and I installed it. After the install, I noticed that it said it had to resynchronize OneDrive which I thought was a bit odd. Today I found out why.
I was going to copy a file from my locally synced OneDrive folder into an email message…except that the file wasn’t there. It also wasn’t on OneDrive (the website) when I checked. But…I could still open the doc from my recent items in MS Word…which said it was on OneDrive. As I started investigating I realized that there are now TWO OneDrive folders on my laptop.

When looking at each individually, one points to c:\users\username\OneDrive…while the other points to c:\users\username\SkyDrive. And no…they are not linked folders that are actually the same. Both are north of 43Gb (files/music/pictures), but one has 18,694 files and the other has 18,902 files. I’m nearly positive that I want those extra 208 files.
It appears that the OneDrive app in the initial build of Win10 pointed to the SkyDrive folder. Build 9860 now points OneDrive to the OneDrive folder. But…it didn’t migrate those or link them or anything…and since the OneDrive app is not pointing to the SkyDrive folder…it obviously DOES NOT SYNC them!!! This has been problematic, because I have been using the “Recent Locations” functionality in MS Word to save files…which has put them into the old SkyDrive folder that is no longer being synced. I need to migrate those extra files over…then kill the SkyDrive folder…which btw…will let me reclaim over 43GB of disk space!
Windows Phone 8.1 Update Oddness
This morning I loaded the Windows Phone 8.1 app on my phone. I had signed up for the Developer Preview specifically for this purpose. Let’s say that my results have been decidedly mixed. I love the new functionality… this is definitely a huge update… much more than what you would expect from a “.1” update. The update seemed to go through fine, and a lot of the additional functionality is indeed there. The really obvious ones are the Notification Center and Cortana. Both are there and work just fine.
But…there are a lot of things that are odd or simply not working as expected. For reference, my phone is an HTC 8X on Verizon.
Duplicate Apps
- Games
- Maps
Apps that won’t launch
- The Games app that is listed first
- The Maps app that is listed first
- Phone… seriously… the Phone app won’t launch on my phone. I can receive phone calls and the app will show. I can dial a number using voice command, but can’t launch the Phone app from either the start screen or the apps list.
Missing Apps
- Camera… it’s just simply not there. Holding down the physical camera button that used to open the camera app to take a picture does nothing now.
Settings that won’t launch
- Start + theme will launch, but some new functionality inside won’t. I can switch the “Show more Tiles” setting, but the “choose photo” button for the “Start background” setting does nothing.
- Notifications + actions
- Wi-Fi
- NFC
- VPN
- Storage sense
- Project my screen
- Sync my settings
- Quiet hours
- Language
- Cortana (although the Cortana app does work)
Update (4/15):
I did a hard reset on my phone and everything cleared up. The reset used a phone backup, so it re-installed all of my apps and maintained my start screen configuration. I did have to do a few manual things (Wi-Fi setup, entering passwords, downloading maps, and a few other misc settings), but overall it wasn’t as painful as I expected a hard reset to be. As a side note…the phone also does not appear to be eating battery like candy any more.
Traveling With My Surface 2
 I recently wrote a post for the CDW Experts Who Get It blog that I wanted to link to from here. My initial post was a bit outside of my normal blog fodder…it was about my experience traveling with nothing but my personal Surface 2. I had a hugely productive flight recently when I intentionally left my laptop at home and took just my Surface 2. This is something I will definitely do again without hesitation. Head on over to the CDW blog for the full post.
The CDW blog is a growing collection of posts from me and my fellow CDW coworkers. This blog covers a wide spectrum of topics and technologies…Microsoft, Cisco, and a lot of other companies that we are partnered with as well. I’ve worked for CDW for a bit more than three years. (Side note…great place to work…I’ve been very happy here. If I know you, and you are exploring job possibilities, ping me.)
A Hypothetical Future of SCCM
I just finished reading an article by Rod Trent where he mentions some possibilities that may come in Satya Nadella’s announcements tomorrow. That brought to mind something I have been thinking and saying for a while now…but never put in print. Just a warning…everything I say in this post is speculation. I have zero inside information from Microsoft that any of this will in fact happen. It is just my attempt to read between the lines of what I see and take a guess about what could happen.
For the last couple of years I have been looking at the future of System Center Configuration Manager. Once SCCM 2012 was released it became pretty clear that this was a very mature product that while could be improved in some feature areas…it wasn’t likely to change significantly from an architecture standpoint. As a consultant, that got me thinking about my IT future…what will I be doing in five years? Add to this the constant move towards the Cloud. And the growing functionality of Windows Intune. And it is not insignificant that Microsoft moved the Intune team into the same building as the SCCM team.
Right now we have SCCM as a VERY solid on-premise solution for managing systems. There is also an Intune connection where you can see systems that you are managing with Intune inside your SCCM console.
Now…what if that got flipped on it’s head?
What if Windows Intune was the “boss” of the management solution. What if you had the option to host an on-premise Intune server for content distribution (app and OS deployment)? In this scenario, Intune would be the equivalent of your current SCCM primary. The (currently fictional) on-premise Intune server would be like an SCCM Distribution Point. Managed from the cloud, but with a local presence for content.
Let that sink in a bit.
And then think about the “Cloud first” mantra that has been coming out of Redmond lately.
Here are some thoughts on how this could change the systems management arena…
- If this becomes a “Cloud first” solution, then Intune would be on the fast track development cycle (the cloud release cadence) and SCCM would be playing catch up (or maybe not).
- Upgrade of the management system? They would take place in the cloud…in Intune. Nothing for you to do.
- Migration to the next version? Again…that would take place in the cloud…as far as a consumer of the service is concerned, the migration wouldn’t exist any more.
- For the consumer of the service (Microsoft’s customers), there are a few appealing aspects of this. Less on-premise complexity to manage. Fewer servers that could go down. Less maintenance/upgrade of internal servers…and the manpower costs associated with that.
- From the Microsoft perspective, let’s be realistic. Microsoft is not a non-profit…they are looking to make money. (I’m not saying that is a bad thing…it is reality.) This would be a recurring revenue stream. If a customer goes down that path and sees the value in the service, then they are likely in it for the long haul.
If this does in fact happen, it would be a big time game changer. It wouldn’t happen overnight, but it would result in a lot of IT folks sweating and figuring out what they will be doing next to pay the bills.
But at this point…it’s all pure speculation on my part. Let’s see if Satya says anything down that path tomorrow.
Sleep well!
Windows 8.1–Initial Impressions
This is a follow on to my “No-Windows 8 Does Not Suck” post that I finally got around to posting.
Last week I loaded the RTM of Windows 8.1 on my production laptop…and yes I did it legally. Kind of a long story behind why that is the case. The short story is that the company I work for is a Microsoft Partner…they are both a Large Account Reseller (LAR) and a System Integrator (SI). I think there are only eleven companies in the world that are both. Net result of that is that for last year or so, the LAR+SI companies have had to do licensing for Windows a bit differently…essentially we were told to use MSDN keys for our production systems that were moving to Windows 8. Odd…but okay…MS told us to.
Now…on to the impressions of Windows 8.1…
I did the upgrade on my laptop last week without any issues. I didn’t time it (kicked it off and went to put my son to bed), but I think it finished in less than an hour. I did notice a few small things after it was done. Below is my list of observations…would love to hear of any new/cool things that you discover as well.
- All of the websites that I had told IE to remember my passwords for…no longer have the passwords saved. But…since the update included IE11 that kinda makes sense.
- I had to reinstall the Cisco AnyConnect VPN. I chose the “Repair” option and it seemed to work.
- My laptop monitor was seen as a “Generic PnP Monitor”, so the screen didn’t look very good initially. Had to go into advanced settings and update driver for the Monitor. See screenshots…

- One observation that I still haven’t nailed down…everything on my laptop screen seems bigger now. I’ve checked the resolution and it is set correctly…but everything seems just slightly bigger. Outlook in particular seems like it is zoomed in. It actually makes it easier to read, but it is definitely different than before.
- Another odd one is on one specific web page…MSN.com. In the past there were navigation arrows that appeared on the picture on the page that rotated every five or so seconds. The nav arrows let you go forward or backwards. Now the arrows appear for a few seconds when the page first loads but then disappear and they don’t come back. It’s actually pretty annoying because if you see something that you are interested in you have to wait until it rotates back around in order to click on it. Update: This has since been fixed.
- Java had to be reinstalled.
- There are new start screen customization options that are pretty nice. Multiple size tiles (small, med, wide, large). More obvious way of naming application groups.
- There is a new “Help+Tips” app…very good for users who are new to Windows 8. Something that honestly should have been there from the beginning.
- A new “Reading List” app. Enables you to push a web page that you want to read later to a common area for delayed consumption. Haven’t used it yet, but it looks promising. Only works with the “modern” app version of IE though. Won’t use it on my non-touch laptop…but will on my Surface when the update becomes available.
- Photos app has new editing functions that look very promising.
- “Modern” apps have new size options. Can run up to four of them on one screen at a time. I haven’t used those apps much on my laptop…but could see doing that now that I can have multiple on a screen.
- Right clicking the new Start button gives the option to shut down or sign out.
- There is a start button (which takes you to the Start Screen), and the Start Screen can be customized by an enterprise to give a specific configuration for your users before you deploy it to them. I personally don’t care about the start button…but I see it being needed to block enterprise deployments because of training fears.
- I saw issues with both yahoo.com and when I tried to start a WebEx meeting. The WebEx meeting webpage gave a message that “Java is not working”. Yahoo.com had an issue where the rotating graphics of the “top” stories…the ones that load five at a time. The first five would load fine. When it went to 6-10, the stories would be simply blank white space instead of the pictures of the stories. The source code on the page indicates that it is all Javascript. The answer to both of these it to put both webex.com and yahoo.com in the “Compatibility View” settings in IE.


Overall…very nice and stable update to an already very good OS.
No–Windows 8 Does Not Suck
This is a post that has been in the back of my mind for a while that I’m finally getting around to writing. Portions of this come to mind when I hear people complain about certain aspects of Windows 8…or when I hear users of other platforms making fun of it (likely without actually using it themselves)…or when someone asks me for an honest opinion since they know that I use it…or when I find something in the OS that I think is excellent and wish others knew. So…in no particular order…here are some thoughts on Windows 8…
Yes it is different. So. What. Some people will tell you that MS doesn’t innovate. When they do, other people scream that it’s too much. Figure out what you want people. If it stayed the same we’d all be looking at an ugly Windows 3.1 box. Yuck.
It is easy to use. My four year old son has ZERO issues navigating my Surface. Neither do my daughters. Seriously…give it half a chance…it’s not hard people. Both my mother-in-law and sister-in-law breeze through it. For both of them I spent maybe fifteen minutes showing them the basics. With that said…Microsoft could have done more on initial release for introducing users to the basics. This has been resolved to a great degree with the new “Help+Tips” app in Windows 8.1.
There is no start button or start menu. So. What. In Windows 7 I look for a tiny thing in the bottom left corner to click that brings up a menu, then I look in that menu for another small section to click, then in that menu for another small thing to click, etc. And God forbid that I accidentally move my mouse outside of the menu when I’m looking for that tiny thing to click…then I have to start over again. Now in Windows 8…I look for the big freaking tile on my Start Screen and click it. Oh and I can customize the screen to have what I want on it. Oh and the tiles are more than just an icon…they update with live info. And seriously…how many of you have used the Desktop as a place to shove shortcuts to every app that you want to open so you can double click them? You’ve given yourself a “Start Screen” already…it’s just not very pretty and has very few customization options. Now you can have all of those shortcuts on your Start Screen…and you can actually see the pretty picture of your kids that you use as your desktop background…instead of little Suzie having an icon shoved up her nose!
Now…although my opinion is that the Start button is not truly needed…I do understand the opposition that Enterprises have had up til now with the fear of training thousands of users. I think those issues have been addressed fairly well in 8.1…there is a start button (which takes you to the Start Screen), and the Start Screen can be customized by an enterprise to give a specific configuration for your users before you deploy it to them.
Hyper-V in Windows 8! Prior to Win8 I was dual booting Win7 and Server 2008 R2 in order to run VMs in Hyper-V for my lab environment. After loading Windows 8, I never booted the server partition on my laptop again…and the VMs I had in 2008 R2 pulled right over with no issues.
Speed in general is better. Boot time is awesome. Love UEFI.
Sync between devices rocks! My Windows 8 laptop (non-touchscreen btw) and my Surface RT are both tied to my Live ID. When I initially set up the Surface, it took me a few seconds to realize what happened. My wallpaper was the same automatically. My home network (with security) had synced up already. My home PRINTER was already set up!
Some of the “Modern” apps. I don’t use a ton of them on my non-touchscreen laptop. I use more on my Surface. The Kindle app is excellent…and it syncs the last read place in a book, so if I read on both my laptop and the Surface…it knows where I left off.
Overall…I have been very happy with Windows 8. I know of a few people that I generally have respect for their opinions on IT matters who were vocal about hating it and switched back. Wonder if they are the same ones who cursed Windows XP when it came out? I think a lot of folks have forgotten the complaints when XP was released. :)
Trust Google? No Thanks.
Here’s another example of why I simply don’t trust Google. The issue is that it is trivial to view the passwords saved in Chrome or Firefox…just open up chrome://settings/passwords and click the “Show” button. ZDNet has a good writeup here. Chrome doesn’t even have an option for protecting those saved passwords behind a master password…Firefox does, but it isn’t enabled by default. (Personally I use Internet Explorer which does require you to enter the logged on user’s password to view the saved passwords.) While this issue has existed in Chrome (and Firefox) for a while, it has recently gotten some public exposure.
What is really comical and sad is the excuse given by the “Chrome browser security tech lead” who stated that the only security that matters is the OS password…that a master password protecting the saved password cache is a “false sense of security”. While I agree that the OS password is the most important security step…it should not be the ONLY step. It seems that the only security breach they are concerned about is the malicious attacker…and seem to care less about giving away the farm to opportunistic or mischievous family/friends/co-workers. Just because I either intentionally or accidentally left my computer logged in and not locked should not give someone unfettered access to all my saved passwords…someone who just happens to be in my house or near my computer. The rest of the comments on that thread are also pretty entertaining. Dude got ripped pretty hard for his original post…then responded with what came across as an arrogant “we know better than you” response that certainly didn’t gain him any friends or allay any of the concerns people addressed in the thread. He just doesn’t appear to “get it” that this is a real problem for regular users.
SCCM 2012 R2 Coolness
Okay…so I’m a month behind on looking through the new features that are coming in SCCM 2012 R2…it’s been a busy month. But in looking through the features…there are some really cool ones that I wanted to highlight. The full breakdown of what’s new in R2 is here.
- You can now select where to put the DB files when you install. No need to tweak stuff on the back end any more!
- Certificate Registration Point (along with Certificate Profiles)…you can now use SCCM to deploy certificates. This is one of those items that are typically done via Group Policy…but it’s surprising how many of my clients have to fight/negotiate with another department/silo in order to get a GPO created or modified. This will simplify that process…which is a very welcome addition!
- Ability to merge one SCCM 2012 R2 hierarchy with another.
- Mac computers can use an enrollment wizard instead of having to install from command line!
- Resultant Client Settings…kind of like RSOP for SCCM client settings.
- Numerous Mobile Device improvements.
- Enrollment of iOS and Android without requiring Windows Intune.
- Wipe/Retire functions can be configured to only wipe company data.
- Enrolled devices can be configured as either “company owned” or “personally owned”…with different configurations for each.
- VPN and Wi-Fi Profiles…again something that has historically fallen to GPO for configuration.
- Software Updates Preview…kinda like the Search Filter function of Software Updates in SCCM 2007. Nice to know what an ADR will do before it actually creates the deployment!
- New Application deployment type…”web application”. It just deploys a shortcut to a web-based app.
- A few OSD improvements:
- Support for Server 2012 R2 and Windows 8.1
- Check Readiness – VERY nice to see this “sanity check” step that has been available via the MDT integration become a native step! So many accidental OS deployments could have been prevented by this simple step.
- Set Dynamic Variables – this brings some of the common steps that are possible via the customsettings.ini file to the masses…putting the cookies on the bottom shelf.
- New report – “Distribution point usage summary”. Shows how much a given DP is used…number of clients connected and data transfer info.
- Multiple Network Access Accounts
- Content distribution improvements
- SCCM “learns” which DPs are connected by faster connections…and uses that info to prioritize content deployment.
- Improved content validation…validates 50 files per WMI call instead of just one!
- Reports can now be controlled via role-based administration. I’ve had multiple clients ask about this.
Those aren’t all of the additions…but they are the ones that I can see my clients being the most excited about. Looking forward to R2!
SCCM Console Install and Update Using the Application Model
When you install a Service Pack or Cumulative Update for SCCM, you also need to update the SCCM console wherever it is installed. And…when you install the console it must be updated to the same SP and CU level as the site server. Unfortunately, the install of the CU only offers the option of creating a Package/Program for updating the console…not an Application that can take care of all of it with one deployment. So…here is how to deploy the SCCM Console via the Application Model.
First, we will need to create an Application for installing the SCCM Console. Create the Application with the name/app catalog/ etc info you wish. I am assuming that we are starting with a SP1 system. When you get to the Deployment Type, here are the settings to use:
- Script installer (since it is an EXE)
- Content location: Best practice is to copy the <SCCMinstall>\tools\ConsoleSetup folder to another location that you use for the source for this package.
- Programs tab:
- Installation Program:
- ConsoleSetup.exe /q EnableSQM=0 TargetDir=”%ProgramFiles%\<FolderName>” DefaultSiteServerName=<FQDN2SiteServer>
- Uninstall Program:
- ConsoleSetup.exe /uninstall /q
- Make sure to select – Run installation and uninstall program as 32-bit process on 64-bit clients.
- Installation Program:
- Detection Method…Registry
- Key: HKEY_LOCAL_MACHINE\SOFTWARE\Microsoft\Windows\CurrentVersion\Installer\UserData\S-1-5-18\Products\CE6E19024E9D710409D3F46536E239F3\InstallProperties
- Value: DisplayVersion
- Leave the 32bit / 64bit box UNchecked
- Data Type: String
- Operator = Equals
- Value = 5.00.7804.1000
- User Experience
- Install for system
- Whether or not a user is logged on
Second, we need an Application for the Cumulative Update (in this case, CU2). I used the Package Conversion Manager to migrate the existing Package/Program for the “SP1 Cumulative update 2 – console update” package into an application. Again…name/app catalog/etc are your choices…Deployment Type has the following settings:
- Script installer (this is a MSP patch)
- Content location: should already be set if you used PCM. If not, default is \\<SiteServerFQDN>\SMS_<SiteCode>\hotfix\KB2854009\AdminConsole\i386
- Programs Tab
- Installation Program:
- msiexec.exe /p configmgr2012adminui-sp1-kb2854009-i386.msp /L*v %TEMP%\configmgr2012adminui-sp1-kb2854009-i386.msp.LOG /q REINSTALL=ALL REINSTALLMODE=mous
- Make sure to select – Run installation and uninstall program as 32-bit process on 64-bit clients.
- Installation Program:
- Detection Method…Registry
- Key: HKEY_LOCAL_MACHINE\SOFTWARE\Microsoft\Windows\CurrentVersion\Installer\UserData\S-1-5-18\Products\CE6E19024E9D710409D3F46536E239F3\Patches\AAD68D6F52CC8E349805BB5169C11B26
- Value: DisplayName
- Leave the 32bit / 64bit box UNchecked
- Data Type: String
- Operator = Equals
- Value = ConfigMgr2012AdminUI-SP1-KB2854009-I386
- User Experience
- Install for system
- Whether or not a user is logged on
- Dependencies
- Add a new dependency on the SCCM Console application that you created above.
Now all you need to do is deploy the SCCM CU2 Application to an AD Security Group that contains the users who should have the SCCM console. The applications above will:
- Determine if the SCCM console is already installed
- Install it if necessary
- Confirm that the console installed successfully
- Then it will determine if CU2 is already installed
- Install the CU2 update if necessary
- Then confirm that the CU installed successfully.
Now…I did not put anything in this to confirm things like the .NET 4 Framework which is a pre-req…but I’m assuming most of you already have that on your systems. If not, I’m sure you can figure it out on your own!
Speaking at MNSCUG
If you are in the Minneapolis area, come out to the MN System Center User Group tomorrow night (Wednesday June 19). I will be doing my “WHY of Configuration Manager” session from MMS. Hope to see you there.
BTW…CDW is sponsoring the group tomorrow night.
Create ISO at Command Prompt
I occasionally need to create a quick ISO to be able to mount to a VM…mainly to get data to a VM that has no connection to the host…or if I want to install an app on the VM when the VM has no access to the internet (all on my laptop). To do that, the easiest way is to burn whatever I am wanting to get to the VM to an ISO. Unfortunately while Windows 8 (which I love) has the ability to natively mount an existing ISO (simply double-click it), it does not natively have the ability to create a new ISO.
Good news is that most of the people reading this likely already have a tool on their system that has this ability…OSCDimg.exe. It is part of the Assessment and Deployment Toolkit…and I think it is also part of WAIK. It is also dang quick. The actual EXE can be found at the following location:
C:\Program Files (x86)\Windows Kits\8.0\Assessment and Deployment Kit\Deployment Tools\amd64\Oscdimg
Syntax is fairly easy. If you are wanting to put everything in the d:\blah folder into an ISO…so that the “blah” folder is the root of the ISO, then the syntax would be something like this:
oscdimg.exe -n d:\blah d:\temp\Blah.iso
Happy ISOing.
Image Build–Manual or Build & Capture?
WHY Series #2
Late last week I got the following email via my contact form. It seemed like the ideal topic for the next post in the series. (Thanks Matt for the message!)
I have a question for your WHY series. I was debating with a co-worker yesterday why you would use the "Build and Capture" task sequence for OSD instead of capturing a system that you already have or have built with another method. I have a few ideas on advantages and disadvantages, but I would like to hear your opinion.
I am going to make a couple of assumptions based on what I read in the question. I interpret “a system that you already have” to mean an existing physical machine that would be captured to create an image. This might not be what the reader intended, but it should be addressed in this post regardless. Best practice is to create a hardware independent image on a virtual machine. (Need to address reasons why for that one in a future post.) I also see the phrase “built with another method”…which I interpret to be essentially a manually built image (as opposed to one using a B&C task sequence).
At the core, those are your options for image creation…automated with a Build & Capture task sequence or build it manually. A slight variation is to use the “Pause task sequence” step in an MDT task sequence to perform a step that can’t be automated…essentially automate all of it except for this one step.
Factors Impacting the Image Creation Process
When looking at the question of whether to manually build the image or use a Build and Capture task sequence, there are several key components that should be considered:
- Image updates. Don’t consider an image to be “golden”…think of it as “current”. This can be a key distinction. Gold implies that it will never change. Current deals with the reality that an image is going to need to be updated. (Let’s not even get into the Thick/Thin/Hybrid image scenario…that’s a discussion for another day…perhaps another “WHY” post.) With that said, unless you are the most hardcore of “thin image” proponents, your image will at least have the OS and updates. Which means that within a month of image creation (Patch Tuesday), the image will be missing necessary updates. How often do you update it? Remember, anything that isn’t in your image has to be installed after the image is laid down…which adds time. I know of a very major company (if you live in the US, you have their products in your home) that had not updated their XP image in several years. The post image update process took a couple of hours to deploy somewhere around 200 updates that were not included in the image. Application updates/upgrades are also part of this equation. Basic gist is that images MUST be updated…ideally on a regular basis.
- If applications are included in the image, are the applications packaged and able to be installed silently? If so, then that process can be automated. If not, then it has to be a manual step. Same goes for image tweaks.
- Ideally you would like to use the same processes for managing apps and updates that go in your image that you use for managing the existing systems in your environment. You already have a “Patch Tuesday” process. Use the same process when building the image. You already have a process for pushing out application upgrades/updates. Use the same process in your image build.
- In the end, you MUST have consistent repeatable results. You need a process that produces a reliable image every single time.
- Lastly, you are busy. I’ve never met an IT person who had too much time on their hands. You need this process to take as little time out of your day/week as possible.
With those factors in mind…lets run them through the grid of our methods for image creation and see how things shake out.
Build and Capture Image Creation Process:
If your core applications that will go in the image can be installed silently…and if you are using either WSUS or SCCM for deploying updates, then this is the ideal situation. Your B&C task sequence could be as simple as “Click Next” and come back later to see your shiny new WIM file. Once you’ve got it working (which I won’t deny could be challenging) it couldn’t be any easier. Once it is going, you will never look back. I know of at least one company that has a recurring Task Sequence deployment to a virtual machine…to create a new image the day after Patch Tuesday each month. Completely automated. Score!
Because the task sequence is automated, there is very little time involved. Just click next and check on it later. Because all of the tasks are automated, there isn’t any room for admin error. Because it is automated, you are more likely to update your image on a regular basis. The process IS standardized and repeatable. Oh…and if a step does have to be performed manually, use an MDT task sequence with the “Pause” step to automate as much as possible…and only do the non-automatable tasks manually.
Manual Image Creation:
Manual is…well…manual. You install the OS from DVD/ISO. You install each app. You apply all the updates. You run Sysprep. You capture the image. All manually. Hopefully you are following a checklist. Hopefully you don’t forget a step. Good luck with that.
The manual image creation process is characterized by the following:
- Slow. All those manual steps take time.
- Time consuming. Because it is slow, realistically, you will not update the image as often as you should.
- Open for admin error (i.e. forgetting a step or installing a component slightly differently upon image rebuild)
- Not standardized/repeatable
Overall…friends don’t let friends use a manual image creation process. You might wish it on your enemies though! ;-) However…see my conclusion below for one instance where you might use an existing image.
Conclusion:
If you’ve followed my blog for long or have seen my presentations at MMS or TechEd, then you should have known I was going to land on the side of using the Build and Capture Task Sequence before you even started this article. In my opinion (that I think I’ve adequately backed up with solid logic), using a B&C task sequence to create your image is the only way to go. It just makes sense from a time/automation/repeatability/manageability standpoint.
The ONLY exception that I see to this is if you are migrating from an old technology (i.e. Ghost) to SCCM, AND you are migrating from XP to Windows 7 / Windows 8. In that instance…would I recommend going through the process of recreating all of your Windows XP images…that you are going to be getting rid of soon anyway? No. In that instance I would say go ahead and capture that existing image (or if it is already a WIM file…see if you can deploy it as-is). Don’t spend the time recreating the image that you are going to be dumping (since XP EOL is coming up very soon!).
Would love your comments and feedback. Keep the ideas for future posts coming!
Until next time…keep asking the right questions.

Subscribe
Recent Comments
-

